Designing Domesticity Our Home Projects Food Services Shop About

Saturday's Kitchen: Grilled Lamb with Mache and Mint

Last weekend we celebrated Easter with family in Ohio. My mother-in-law treated us to a lovely Easter lunch of marinated, butterflied, grilled leg of lamb, a recipe from Tyler Florence. Suggested sides of lemony hummus and green salad help to keep this a light Spring dish.
I loved it! 


Ingredients:
1/2 cup extra-virgin olive oil, plus more for grilling
1/4 cup red wine vinegar
4 garlic cloves, chopped
1 tablespoon dried oregano
1 tablespoon fresh oregano
1 tablespoon fresh thyme leaves
1 lemon, juiced
Kosher salt and freshly ground black pepper
1 (3 1/2 pound) boneless leg of lamb, butterflied
1 bunch mache
1 bunch mint, leaves only
2 scallions, sliced thin
Lemony Chickpea Puree, recipe follows

Directions:
To make the vinaigrette, whisk together the oil, vinegar, garlic, dried and fresh oregano, thyme, and lemon juice; season with salt and pepper. Pat the lamb dry and place it into a shallow platter. Season it well with salt and pepper. Pour 1/2 the vinaigrette over the lamb and let it marinate for at least 15 minutes or up to 2 hours.

Heat the grill or grill pan and oil it lightly. Remove the lamb from the marinade and grill for about 15 to 20 minutes per side for medium-rare. (Adjust the time accordingly for other degrees of doneness.) Cover and let rest for 10 minutes. Carve into thin slices.

Toss the mache, mint leaves, and scallions in a bowl and season with salt and pepper. Dress the salad with about 3 tablespoons of the vinaigrette and mix well. Place the lamb onto a serving board. To serve, spread the Lemony Chickpea Puree over the lamb and put the greens on top of the puree.

Lemony Chickpea Puree:
1 cup dried chickpeas, soaked overnight
1 bay leaf
Kosher salt and freshly ground black pepper
1/2 cup extra-virgin olive oil, plus more as needed
3 lemons, zested and juiced
2 cloves garlic, finely minced
1 tablespoon finely chopped parsley, for garnish

Drain and rinse chickpeas and put them into a saucepan. Cover with cold water by 2 inches; add the bay leaf and salt and bring to a boil. Reduce heat and simmer beans until tender, about 1 1/2 hours. Drain, reserving about 1 cup of the cooking liquid. Remove the bay leaf and discard.

Put cooked chickpeas into a food processor or blender. Add the olive oil, lemon juice and zest, garlic, and salt and pepper to taste. Process until smooth; add some of the reserved cooking liquid to thin, if needed. Serve on top of the Grilled Marinated Lamb or put into a serving dish and garnish with a drizzle of olive oil and the parsley.

Yield: 4 cups

Cooks Note:
We used canned garbanzo beans (1 28 oz. can), which worked well and saved on the soaking overnight step.

As always, if you try it and like it, please do let me know!

Until next time, 
Read more ...

Welcome to our temporary kitchen

Because I am sure that enquiring minds want to know, I thought I'd share our temporary kitchen.


Not too bad, right? 

We brought the breakfast room table and chairs down to the basement and purchased two banquette tables to act as our temporary counter tops.


This table acts as our primary prep space: knives, cutting boards, cooking oils, etc.


And this table houses our cooking items: coffee pot, toaster oven, and our soon to arrive hot plate!

Under both tables are bins filled with wrapped items that won't be used for next couple of months as well as a couple pots, pans, bakeware, etc all easily accessible on top of the bins.

A couple of $5 vinyl tablecloths from TJ's help to hide the clutter and make it feel more homey.


We also brought down our jam cabinet from the breakfast room. It's acting as our pantry. 
Like the Budweiser dart board peeking out from behind it? ha!


Such a handy piece of furniture. Wish we had been able to incorporate it into the new kitchen!

I'll spare you the pics of the old fridge which was moved to the utility room. 
And the big, ugly, old utility sink where we are doing all our washing up.
I definitely miss the dishwasher from our old kitchen right about now!

All in all, this temporary kitchen is working out pretty well - we are lucky to have this space while the madness and chaos of the kitchen remodel goes on above us.


If you follow me on Facebook, you've seen this picture of one of the meals created in our temporary kitchen. Grilled peppercorn marinated salmon, toaster oven roasted asparagus, and green salad with grapefruit, avocado and goat cheese! 

Until next time, 


Read more ...

Demo - the madness begins!

Our massive kitchen project is finally in progress! 
Check out some of the pictures from the first day of demolition!


Kitchen (west wall) before.


Kitchen (west wall) after.
Check out that topiary wallpaper hidden behind the stove backsplash.
And now we know why the kitchen was always so drafty - no interior walls behind the cabinets! 


Kitchen (west wall) again. 
The soffit is still to be removed.


Kitchen (east wall) before - pantry and butler's pantry.


Kitchen (east and north walls) - radiators to be removed.


Kitchen (south wall) breakfast nook.


Kitchen (south wall) radiator and window to be removed.

Demolition goes so fast! 
I can only hope that the rest of the project will be just as smooth and quick. 

Next up: soffit removal, floor leveling, window replacement, door repositioning, electric and plumbing updates. Don't worry, I won't bore you with every stage! But you can definitely expect some highlights from time to time.

Linking in with Met Monday at Between Naps on the Porch.
Until next time, 


Read more ...

Saturday's Kitchen: Salmon with Greens and Creme Fraiche

One of the last meals to be made in our old kitchen - this is a new, yummy and mild, Spring favorite in our household!


Ingredients

1 tsp olive oil
1 leek, thinly sliced
250 mls chicken stock
100 g creme fraiche
140 g frozen peas
140 g frozen broad beans
4 skinless salmon fillets
small bunch chives, chopped

Directions

1. Heat the oil in a large, deep frying pan with a lid. Cook the leek for 5-10 mins until soft but not coloured, then pour in the stock. Simmer for a few mins until reduced slightly then add the crème fraîche and season. Cook for 1 min more.

2. Tip in the peas and beans, nestle in the salmon fillets, then turn down to a simmer and cover. Cook for 12-15 mins, depending on the thickness of the salmon, until cooked through. Sprinkle on the chives and serve with mashed potato, if you like. 

Cooks Note

Finding broad beans here can be a bit problematic; we doubled the amount of peas.
I served mine with Israeli Cous Cous as mashed potatoes seemed a bit heavy for Spring.

As always, if you try it and like it, please do let me know. 

Until next time,
Read more ...

Spring Front Porch Planters

Despite the horrid weather currently being enjoyed in the Chicagoland area, I went ahead and updated my front porch planters for Spring.


One pot features a beautiful purple/blue hydrangea and multi-colored pansies.


My little helper potted the second pot with only multi-colored pansies. It's a bit lack luster at the moment, but she had fun and I am sure they will fill out a bit in the near future.


There is just something about hydrangea that I really love.
They are a surprisingly hearty plant and I can't wait for the rest to spring up from our garden.


Now, if only this weather would change and perhaps we could get that garden going!

What about you? What do you plant for Spring in your pots?

Until next time,
Read more ...

Raised Bed Gardens: A family affair

It was such a lovely day today, that our whole family spent the morning outdoors working on the new raised bed gardens!


There was a bit of work done in advance, in terms of clearing space! But for the most part, this whole project was started around 10am and completed by 1pm!

Further evidence of work done to clear the area!
Have I ever mentioned how overgrown this whole area was when we bought the house?
For a refresher, click here.


Mr. DD started with 6, 2x12 planks of pressure treated wood, and quickly turned them into 2, 4'x5' beds and 1, 4'x4' bed.


Once the frames were constructed, we stapled chicken wire to what will be the underside of the boxes. This should help to keep any little critters from digging under and up into our gardens.


Flipped over and in it's new resting spot.
Our daughter was a big help - as always!


One of my books suggested applying wet newspaper as a first layer. This will ensure nothing grows up from the ground below and also adds a nice composting layer.
(The wetting part is really just to keep the paper in place)


Next, we added 2-3 wheel barrows of soil per bed.
Again, our helper ensured that this would be a smooth process!


Then we added a layer to each box from the composter that I started last summer.
So excited to actually use it after all these months!
To read more about how I am making composting work for me, click here.


Once the compost was tilled in, we added another 1-2 wheel barrows of soil to each box.


Here they are all filled up and looking ready for some plantings!


We left about a 18" between each box for easy access to all sides.

The view from my kitchen!

Future plans include a chicken wire fence surrounding the entire garden.
And of course, doing a bit of planting and growing.


Until next time,

Read more ...

Spring Mantel

Spring is definitely upon us - a new season, calls for a new mantel design.


A simple update to include boxwood topiaries wrapped in burlap, a pair of green birds, ginger jars, and glass hurricanes containing birch wrapped candles.


I wanted to bring in natural elements paired with bright pops of color to really get that Spring feeling.


What do you think? 

Did I succeed? 

Are you feeling Spring?

Until next time,


Read more ...

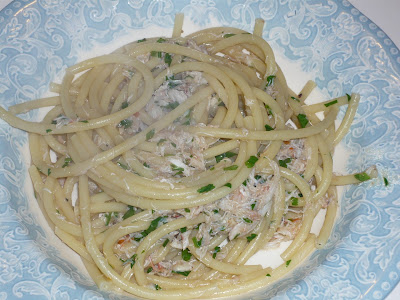
Saturday's Kitchen: Crab Linguine with Chili & Parsley

This week's Saturday's Kitchen recipe is a pub staple throughout the UK, but is also inspired by all the lovely fresh seafood I enjoyed on my recent trip to Florida.

It's quick, easy and something a bit different for your mid week meal.


Ingredients
400g linguine

4 tbsp extra-virgin olive oil
1 red chilli , deseeded and chopped
2 garlic cloves , finely chopped
1 whole cooked crab , picked, or about 100g/4oz brown crabmeat and 200g/7oz fresh white crabmeat
small splash, about 5 tbsp, white wine
small squeeze of lemon (optional)
large handful flat-leaf parsley leaves, very finely chopped

Directions
1.Bring a large pan of salted water to the boil and add the linguine. Give it a good stir and boil for 1 min less than the pack says. Stir well occasionally so it doesn't stick.


2.While the pasta cooks, gently heat 3 tbsp of olive oil with the chilli and garlic in a pan large enough to hold all the pasta comfortably. Cook the chilli and garlic very gently until they start to sizzle, then turn up the heat and add the white wine. Simmer everything until the wine and olive oil come together. Then take off the heat and add the brown crabmeat, using a wooden spatula or spoon to mash it into the olive oil to make a thick sauce.

3.When the pasta has had its cooking time, taste a strand - it should have a very slight bite. When it's ready, turn off the heat. Place the sauce on a very low heat and use a pair of kitchen tongs to lift the pasta from the water into the sauce.

4.Off the heat, add the white crabmeat and parsley to the pasta with a sprinkling of sea salt. Stir everything together really well, adding a drop of pasta water if it's starting to get claggy. Taste for seasoning and, if it needs a slight lift, add a small squeeze of lemon. Serve immediately twirled into pasta bowls and drizzled with the remaining oil.

Cook's Note
If you are lucky enough to live in an area where fresh crab is readily available, I'm jealous; if you don't, most grocery stores sell picked crabmeat in their fish department, which is the route that I went with. Admittedly, some of the flavor is compromised by the lack of brown crabmeat - but beggers can't be choosers!

Wine Pairing
I served this with a fresh and zingy, New Zealand Sauvignon Blanc, which most of my friends will tell you is my go to white wine variety of choice.

If you are looking for a light and fresh alternative to your oaky Chardonnay - give it a try. Kim Crawford can be found at most grocery stores and is a sure winner.

As always, if you try it and like it, please do let me know.

Until next time,


Read more ...

Kitchen Pendent

Along with the search for a new kitchen sink and faucet, we are also ins search of a pendent light to hang over the sink. Here are the current contenders.


Quite the selection, as you can see. I'd love to hear your thoughts. I already have my favorite, but am curious to hear yours!

Until next time, 

Read more ...

Saturday's Kitchen: Bean and Pasta Stew with Meatballs

Another quick and easy one pot stew the whole family will love, curtesy of BBC Good Food Magazine. Sausage meatballs add a ton of flavor to this already protein packed, hearty meal.
Tessa didn't even realize she was eating all the yummy veggies.
Perfect!


Ingredients
6-8 pack pork sausages
1 tbsp olive oil
2 onions
3 celery sticks, diced
2 carrots, diced
3 garlic cloves, finely chopped
400 g can chopped tomatoes
1 L chicken stock
175 g macaroni
410 g can cannellini brans, rinse and drained
handful flat leaf parsley, chopped


Direction
  1. Snip the ends off the sausages and squeeze out the meat. Roll into rough walnut-sized meatballs. Heat half the oil in a large, wide pan and fry until browned, around 10 mins. Remove from pan and set aside.
  2. Add the rest of the oil to the pan. Tip in the onions, celery and carrots and fry for 10 mins until soft. Add garlic and cook for 1 min more. Tip in the tomatoes and stock. Bring to the boil and simmer for 10 mins.
  3. Stir in the macaroni and return the meatballs. Simmer for about 10 mins until pasta is cooked and meatballs are cooked though. Stir in beans and heat until piping hot. Season, mix in parsley and serve.


As always, if you try it and like it, please do let me know.

Until next time,
Read more ...
Related Posts Plugin for WordPress, Blogger...

Lijit Ad Wijit