Designing Domesticity Our Home Projects Food Services Shop About

Chip It

Chip It....the new color selection tool by Sherwin Williams.  
Download it to your computer, then use the software to receive custom color recommendations.
What a brilliant idea, right?


We're trying to decide on a color for our dining room at the moment, so why not give it a try. 
My jumping off point: window covering fabric.
Scan it up, baby.

We're hoping to highlight the coral/orange color, so here's what we came away with...


Interesting. Three different colors all pulled from the same fabric. Of course, I did scan three different images of the same fabric. So clearly, this is subjective to your image. 

Unfortunately, none of these are going to be the right color for us. Back to the drawing board. I guess there's no easy way out for sampling colors...we'll just have to rely on old faithful. Sample pots. And blotchy walls. 

So, tell me. Have you used the Chip It tool with much success?

until next time, 
Read more ...

Blue Rocker

Phew, it's been a busy month. We've had guests 3 weekends out of 4, with my parents just leaving today. We also babysat for our nephews Saturday/Sunday - the cousins have so much fun together, it made the less than productive weekend all worth while. 


With practically every spare moment we have going toward the dining room project, and our busy schedule as of late, I only managed to finish off one tiny project this weekend.  

I finally got around to getting a coat {or two} of paint on this long neglected rocking chair. 


I guess long neglected might be a bit of an exaggeration. We received the chair 3 years ago as a gift and it was hate at first sight for me. The pink and green was ok, but the sparkles were just not for me. I knew I wanted to paint it, but I just never had a reason. 


Welcome to my reason. The basement family room. Our remodeled media stand and new TV are leading the way. 

When I was shooting the media stand, I staged it out with one of the kids play table chairs, which made me think of the rocking chair.  


A couple of coats of navy spray paint later, I'm loving the pop of color in this dark corner. The only think I'm not loving is how hard these pictures were to take and how badly they came out. The high gloss paint isn't helping... making it look like a fairly uneven paint job :(


In other news, I just had to share this picture of Baby E on her 1st birthday. I think the cupcake kind of scared her. She didn't really like it either, not even the icing. A child that doesn't like sweets - not sure she's mine!


Check out that nostril flair after her first bite. Definitely not a fan. 

A great weekend, despite the lack of projects.

linking in with:

until next time, 
Read more ...

Dining Room Progress: Week 3 {arch}

Week 3 in the dining room...also know as the project that so did NOT go the way we thought it would. 


You may remember from my previous post that we were under the impression that the decorative arch doorway from the foyer into the dinning room was not original to the house. We had assumed that the previous owner had enclosed the arch to add doors to the dining room. 


Meaning that to cut out the arch would be easy peasy, 2 day job at the most.  Well, we were wrong. 

What else can I say.

The guys we hired to do this job did everything right. They started by removing the existing casing. Then chipping away at the plaster to reveal what was underneath. 


Just like with the wallpaper, you never know what you'll find under the surface. 
And I can tell you, we did not expect to discover that the support beam was actually below the arch


We weren't left with too many options. The ceiling had to be supported and a new beam installed to keep everything on the up and up. Literally.


Our guys handled it all in stride and the project was only delayed by a couple of days. 
Just enough time for me to really second guess the need to open up the arch...


But, it's done and we really couldn't be happier. The room looks twice the size and the foyer actually gets natural light now. Amazing. 

Unfortunately, it's not all sunshine and roses with this project. There were floors that needed to be patched, moulding that couldn't be matched and a whole host of other issues that we hadn't anticipated. No surprise what we'll be doing next week then. 

I'm sure most of you are no stranger to this type of 'bigger than expected' project. Please share. Make a girl feel better. 

PS. And, if you haven't noticed, I've been updating my blog 4-5 times a week the last couple of weeks. Trying to step it up a bit around here. Your support is always appreciated.

until next time, 
Read more ...

Sharing The One Pot Love

If you follow me on facebook, you already know I have family in town this week. And you probably know that I'm making a family friendly, and hearty corn chowder {recipe from this amazing lady - her story is unbelievable} to have in the fridge. 


I was so inspired by her post and her one pot recipe, that I decided to share a one pot recipe that I made, and loved, recently.

Honestly, is there anything better than a one pot? Easy to make, easy to clean up, always feeds a crowd. And oh, so comforting!

This Moroccan chicken one-pot recipe is from the BBC Good Food Magazine, October issue. The beautiful earthy flavors of the stew like tagine are balanced by the bright accouterment of dried cherries, red onion, lemon zest, mint and feta cheese. 


Ingredients
4 boneless, skinless chicken breasts
3 tbs olive oil
2 onions, 1 chopped, 1 thinly sliced
4 oz canned tomatoes
4 oz ginger, roughly chopped
3 garlic cloves
1 tsp tumeric
1 tbs ground cumin
1 tbs coriander
1 tbs cinnamon
1 large butternut squash, peeled, deseeded, and cut into large chunks
600ml chicken stock
2 tbs brown sugar
2 tbs red wine vinegar
4 oz dried cherries

To serve
1 small red onion, finely chopped
zest of 1 lemon
handful mint leaves
4 oz crumbled feta
couscous 


How to
1 Season the chicken. Heat 2 tbs oil in a large casserole. Brown chicken on all sides. Remove. 

2. Meanwhile, combine the chopped onion, tomatoes, ginger and garlic in a food processor. Process into a rough paste.

3. Add the remaining sliced onion to the pan, fry in the remaining oil until soft. Add the spices and cook for 1 min or until fragrant. Add the paste and cook until softened. 

4. Return the chicken, squash, stock, sugar and vinegar to the pan. Bring to a simmer, then cook for 30 mins or until the chicken is cooked through.

5. Remove the chicken to cool slightly, then shred into bite size chunks. Meanwhile, stir in the dried cherries. Continue simmering the sauce to thicken. Add back the chicken and adjust seasoning. 

6. Combine the red onion, lemon zest, mint and feta. Scatter over the dish. Serve with couscous. 

I hope you try it and love it, as much as we did.

So tell me, do you stash extra meals in your fridge when you have company in town? Or is it just me? I mean, you never know when someone else is going to be hungry and I hate to have nothing to offer them...you know?

linking in with: 

until next time, 
Read more ...

Gold Stars

Little Miss T and I finished off another project this weekend and she'd like to share it with you...check out her new reward board. Complete with gold, sparkly stars.


Don't tell us you can't see it. 
That's just ridiculous - it's as plain as day. 
Well, at least to us, and that could very well be my most favorite part of this project. 

You see, as parents, the Mr. and I have been noticing how well Miss T reacts to positive feedback, like stars, etc. Hence the idea of a reward chart was born. 


But you know me, it couldn't just be any old boring, store bought reward chart. No sir.

Once we set our minds to it, this project came together pretty quickly and most importantly, pretty inexpensively. {Because as any experienced parent will tell you, the novelty will probably wear off.}


The frame was left over from the framed alphabet cards in the nursery. And you may remember my way-off-base fabric for the guest room? Together, they create what looks like a cute little bit of fabric art for the big girl room.

Come a little closer and you'll see the chart outline we drew on with a dry erase marker. Easy cleaning for changing up the tasks or even erasing all together, when the novelty has officially worn off. 


The stars are simple wooden cutouts we picked up at Michael's. Transformed with a quick coat of gold spray paint, followed by gold sparkle paint, and a clear coat of protectant to keep it all in place. 
Sorry, but I do not want gold glitter all over my house!

A little dab of sticky tack adheres them to the board.


The gold stars and sticky tack are definitely Miss T's favorite part. That, of course, and getting them.


For now, we are loving our new reward chart and it's helping to keep us on the straight and narrow :) We're working on cleaning our room, getting in and out of our car seat all by ourselves, eating balanced meals, and above all, listening!

P.S. thanks Aunt Linda for the headband. We haven't taken it off since Saturday!

linking in with:

until next time, 
Read more ...

Dining Room Progress: Week 2 {patching and prepping}

Last I left you, we shared this beautiful image of the little snafu that occurred during the moulding and wallpaper removal. In case you were wondering, we {or more like Mr. DD} spent the whole of the week repairing and prepping the walls for the new moulding.


I'm loving that after 10 years of marriage, there are still surprises. I  had no idea Mr. DD knew how to hang dry wall. But, evidently he does...so, a spare piece came out of the garage and that whole area was covered in a matter of minutes. Nice.


Of, course we were still left with a lot of cracks and holes in need of patching. 


We picked up this repair kit from Lowe's, which worked out really well for the bigger areas. 

The smaller cracks were simply taped and mudded. We picked up the pre-mixed kit, again at Lowe's, to make it easy on ourselves. Or on Mr. DD, whatever. 


Did I mention there were a lot of repairs to make?


Lots of repairs = lots of sanding. 
Definitely not my favorite part.


So, there you have it. Not a very exciting week, but certainly a much needed one. Big shout out to Mr. DD for working 3 nights in a row to get this done! Trooper.

Next up, the arch! We're actually in the process right now, and if you saw my post earlier this week, you already know that it hasn't exactly gone according to plan. 
Seldom does around here :)

until next time, 
Read more ...

Tricky Windows plus a Fabric Decision

By now, you probably know that our home is riddled with tricky windows. 
{Mostly because I am always complaining about them.}
We've got them in the living room, bedrooms, and dining room. Below window radiators are the biggest source of aggravation, but we're also blessed to have windows that open in on the first floor.

{please excuse my dusty floors, we're in the middle of construction around here and I refuse to clean up everyday when the dust is still flying!}

In the living room, we opted for full length curtains. In the summer they hang over the radiators; in the winter, they puddle on top and kind of drape to the side. No, this is not ideal. But it works. And, long panels were definitely the look I wanted!


In the kids bedrooms, we have shorter curtains. They are kids, for crying out loud, they don't care! And neither do I.


In our bedroom, we chose faux, relaxed roman blinds over the radiators. We don't open those windows or even raise the shades really, simply because they face both neighbors homes, which are only a driveway away. Not much for privacy, but this is urban suburban living, after all.

{welcome to the construction zone}

Which brings me to our dining room. The only functioning window {the others have storm windows in place that do not have screens} in this space is over a really long radiator and, of course, opens in. To make matters worse, the new furniture layout features large pieces on either side of the window - virtually ruling out long panels. So, again, we've decided to go with a roman blind. This time of the structured variety. And, it needs to work! The 7' long, non functioning windows will have regular full length panels.

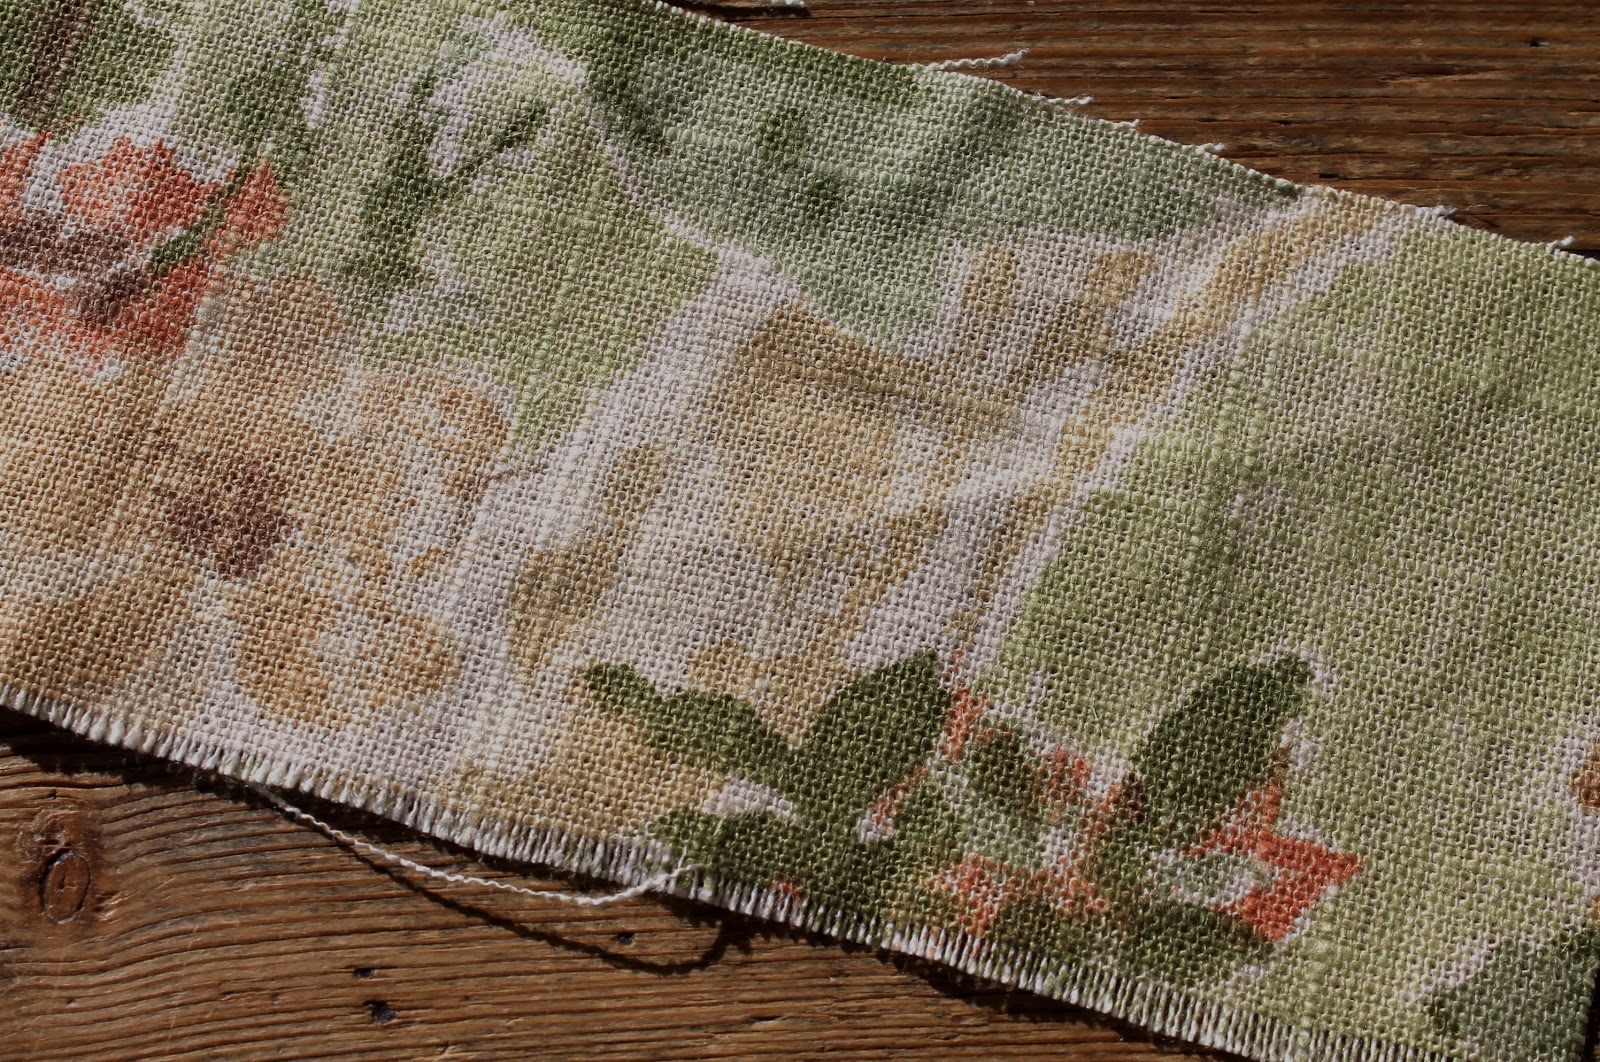
{notice the patch, more on that later this week!}

Now, you know I like to DIY as much as possible, but seeing as these treatments need to function and I've only just learned how to sew...I decided to hire out.
I know, the shock horror of it all. I can barely believe it myself.
But I know we'll be happier, in the long run, with a professional job. And fortunately for us, we were referred, by my cousin, to a wonderful and affordable seamstress in Ohio. 

{these pictures were taken outside to hopefully give a truer reflection of the color}

Mr. DD, my Mom, and I all agreed {another shock!} on this fabric and we can't wait to see the finished product!


So, here's my question to you - do you approve of mixed treatments {one roman blind, and one set of long panels} in one room? 

until next time,

Read more ...

Roll Over

Have you ever noticed how one project often rolls into another? Take for instance, our dining room. What was supposed to be a simple removal of an enclosed arch has morphed into another much larger scale project; involving headers, supports, replacement floors and a lot more work than either of us bargained for. 


But, that's a topic for another day, because I'm too annoyed to deal with it now. 

But, it does lead me to the point of this post, which is that a similar thing happened with this little corner of our kitchen that's now sporting a new pair of cafe curtains. Once I started working over here, I realized I hadn't updated the shelving since the kitchen was completed a little over a year ago. 


Time to add in a little Fall, wouldn't you say? 

Some of the fundamental foundation pieces are still in tact, like the flour/sugar canisters and the Provencal tray we received as a wedding gift many moons ago. 


And, of course, I couldn't part with my collection of blue and white Cornishware. Certainly this little bundle of decorative wheat helps to temper all that blue and white and add to the Fall feel.


I also added another antique Cornishware bowl that's just been sitting in the basement {why, i'm not sure.}. Filled with faux apples and pinecones, it picks up on the bit of red featured in the window treatments. And, definitely feels like Fall - when all things apple come into play.


Rounding out the new additions to the shelving are a sun-loving, fall hued angel plant and a larger than life, faux acorn. 

I'm liking how the darker fall accents are playing off the copper kettles and helping to balance out all the white. 

These little pops of color in our white & cream kitchen are certainly helping it feel more seasonal. Now, hopefully, I'll remember to change it out again before a years time! 

How about you - any current projects rolling into new ones?

linking in with:

until next time, 
Read more ...

Privacy Please

As the work carries on in our dining room, I've been keeping busy tackling smaller projects around the house. Like these new cafe curtains I added to our kitchen window. 


Here's how it looked before with the woven blind. 
Now, don't get me wrong, I loved the warmth and texture that the old blind brought to the space, but the privacy factor just wasn't there. 


As much as I like my neighbors, and I hope they like me, I just don't think either of us really need to see each other in our jammies pouring our morning coffee. You know what I mean?


So, after a couple of weeks staring at the tension rod I got at Lowe's, I decided to take advatage of this rainy day and get on it already.


I checked my fabric stash and decided to go with some leftover fabric from our living room curtains. For now, I think it works, but I could also see switching out the fabric after a bit.


I'm loving the pop of color in the cafe curtains, especially on this gloomy day. 


As always, when I finish one of these little projects that has been on the to-do list for awhile, I wonder why I put it off so long. 

What about you, did you get anything crossed of your to-do list this weekend?

linking in with:

until next time, 
Read more ...
Related Posts Plugin for WordPress, Blogger...

Lijit Ad Wijit