Designing Domesticity Our Home Projects Food Services Shop About

My Love/Hate Relationship with Milk Paint

I've been really dragging my feet on the re-vamp of my second antique chair. The feedback on the first chair was good in theory, but I also experienced my first round of really very negative comments. You win some, you lose some - I guess. 


But we've had a couple of cold, rainy days around here so I finally had time to turn my attentions to this second chair. As I mentioned previously, these chairs were purchased together and in quite a state of disrepair. Once they were repaired, I opted to paint them with milk paint in light cream. 


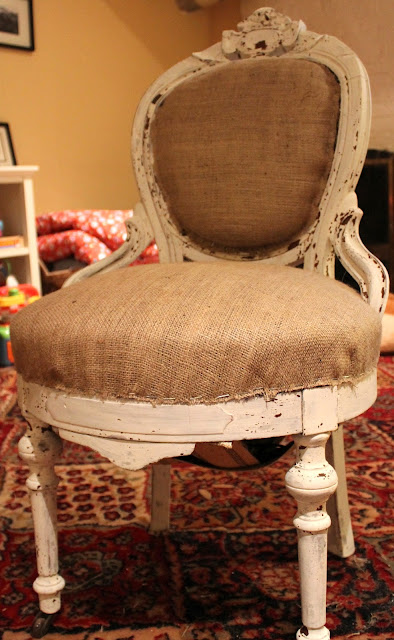
Here's where it gets interesting. Now, I've used milk paint in the past {check it out here}, but this project really drove it home for me. This is some seriously finicky stuff. Look at the differences between the right chair and the left. Both in the same starting condition, both painted with the same paint.


Milk Paint comes in a powder form that you mix with water when you're ready to use it. It has a fairly short shelf life, recommended to be used within 24 hours. Since I knew I wouldn't be painting both chairs at the same time, I split the powder in equal parts and mixed up half the paint, saving the other half for the other chair. Makes sense, right? I thought so too. 


The first chair received two coats of paint. The paint, literally, distressed itself. Sticking in some places and not in others - but it did cover nicely with two light coats. 


The second chair took 4 coats to cover. And it didn't distress itself to the same extent as the first chair. Why? I'm not sure. Both were painted with the same paint, same conditions, etc.


So, what's the moral of this story? If you're a control freak and want the exact same finish from project to project - this is not the product for you. But if you're interested in achieving an authentic, antiqued, distressed look this product will certainly help you get there. 

Fortunately for me, although these chairs will be in the same room, they won't be side-be-side so the differences won't be quite so obvious. Either way, I'm still loving the look of this pair. And I'm really happy to mark another project off the on-going list for the master bedroom

Have a great weekend.

linking in with:

until next time, 
Read more ...

Celebrations

Memorial Day weekend is always a bit of a celebration around here. Not only is it the unofficial start of Summer, but we can all be relieved to know that it's now ok to wear white pants. I kid, I kid. We all know you can wear white pants year round now. 

{homemade angle food cake with fresh whipped cream and raspberries}

What's really important about Memorial Day weekend is my birthday. I'm also kidding about the birthday - just not the same the older you get, right? 

Anywho, my parents almost always come in to help celebrate/commiserate and this year was no exception.


{incidentally, great and amazing are understatements when it comes to this show}

They were kind enough to watch the girls while Mr. DD and I took in a show downtown and had a lovely meal after. Thanks guys, you're the best!

Speaking of Mr. DD, he had his hands full cooking this weekend. Most of the recipes were from the new Bon Appetit Magazine, June 2012 issue. I've had this subscription for years, and quite honestly, have debated canceling it for awhile now. But every once in a while they put out an issue that is completely approachable, manageable and just plain good. This is that issue. 


Friday we started with the grilled flatiron steak with tapenade and tomatoes. The crusted, smokey steak paired with the tapenade was an unexpected and lovely combination. Honestly, the tomatoes were nothing special, but that steak...oh, yeah. Seconds please.


We enjoyed the slow roasted salmon with cherry tomatoes and Israeli couscous on Sunday night. Mr. DD slow roasted the salmon indirect on the grill and it was divine. 

Both recipes were easy, quick and delicious. Kind of a rarity from the usual Bon Appetit fare. Not the delicious part, obviously, but the quick and easy part. 


We were also quite taken with their taco article. So much so, that we had tacos on Monday night. Although we didn't follow any of their filling recipes, we did enjoy the quick pickled onions, which will definitely be on the must-haves list for our Mexican nights. Yum.


Food, eating, more food and more eating. That about sums up our weekend. Needless to say, I'll be needing that boot camp sooner than later. I hope you enjoyed your weekend, whatever you got up to. 


until next time, 
Read more ...

Stuck

It seems all I've been posting about lately is outside. If that's not your thing, this post won't float your boat either. Because it's all about the screened-in porch. 


This memorial day weekend, we officially opened the porch. It's absolutely perfect on a cool morning this time of year.  With the fan on, a late afternoon is even manageable. And, of course, in the evening the porch really comes into its own. 


It's a small porch, probably about 10 x 10 and I've {quite possibly} tried every single combination of furniture placement. 


We're talking, taking everything out of the room and starting from scratch. Then bringing each piece back in, one at a time, hoping for just the right, magical solution.


There were moments when I was cornered in by furniture. The only way out was to hop, skip and jump over things in this small space. At one point, I had to send out an S.O.S mid move when I found myself wedged between the loveseat and the door. It was all pretty comical, really. 


And in the end, guess what we ended up with? The same arrangement as last year. Can you believe it? All that work, for nothing.  


I suppose we can be confident now that we have covered all our bases. And that's certainly a relief. 

I hope you enjoyed your holiday weekend. And didn't find yourself stuck while re-arranging any furniture. I'll be back with more about our weekend later in the week.

Linking in with:

Until next time, 
Read more ...

All Hail Queen Kimberly

If you follow me on Facebook or Instagram you might have noticed I picked up a couple of my favorite ferns from our local grocery yesterday. Actually, saying 'favorite' might be a bit of an understatement. I simply love these ladies. 

I know, technically, that the name of this lovely lady is the Kimberly Queen fern, but Queen Kimbelry just worked so much better in the title. Artistic freedom and all that.

No matter how you slice it, it's easy to see why she would have such a royal title - she's so regal, almost majestic. 


There are so many reasons that I love these ferns:
they do well in shade,
are extremely low maintenance,
barely shed at all,
and they get huge.


Quite the statement maker, really. And for $12.99 you just can't beat it. In fact, these were less expensive than the smaller versions I found at Home Depot last year. Seriously, these might be bigger than mine were at the end of the growing season last summer. Too good to pass up.

So good they definitely deserved their own post.


Besides, who doesn't need a beautifully flanked garage door. It's clearly the royal entrance. 

Enjoy your holiday weekend. We'll be spending ours outside, visiting with my parents and celebrating my birthday. 

until next time, 
Read more ...

Wisteria Dreaming

Our backyard has been a work in progress since we bought this house, nearly three years ago. We've been tackling one little area at a time and have shared our shade garden, lilac garden, kitchen garden and most recently our hydrangea garden.


But, unfortunately, there is more. More unkempt areas that are in need of our attention. I know it seems hard to believe in this small, suburban, urban yard, but there is. And it's a doozy.


This area is in the very back of the yard, mostly in shade, with some fairly significant drainage issues. We started clearing it awhile ago, but that's where the progress ended. 

There were at least 3 rows of hostas back here, which we have since moved to other areas of the yard. Leaving us with quite the eyesore. 


Due to all the issues back here, we really have been stumped as to what to do with the area. What will grow back here, in the shade and damp? We needed a plan. 

Well, I am thrilled to share that we've finally agreed on one. 


We're planning on adding a stacked stone wall with a pebble foundation to hopefully sort out the drainage issues. So reminiscent of the English countryside...we're in love. 


Then we'd like to add a pergola, to distract from the view of the neighbors garage. 


And finally, cover the pergola in beautiful purple blooming wisteria. Swoon. 


And if our girls are really lucky, we'll incorporate a cute little porch swing.

So, the plan is set, which is great. But the work still has to be done, and as you know, that's the hardest part. Fingers crossed we make some progress this year. 

until next time, 
Read more ...

Kitchen Garden 2012

We spent all of last Sunday outside preparing our kitchen garden.  Seeing as it was Mother's Day, my girls were more than happy to help. I'm so lucky.


You may remember that we built this garden last Spring and spent a whole Summer growing veggies. It was definitely a great learning experience that the whole family enjoyed. Unfortunately, it didn't do much to encourage our pre-schooler to eat her veggies, but perhaps this year...{yeah, right}


After the growing season last year, we knew we needed to incorporate a much more substantial support system for the tomatoes and beans. I think by the end of last Summer, we had a series of bamboo stakes that were strung up to the fence...it wasn't exactly the look I was going for.


This year, we found these very affordable trellises at Lowes. There's just something about cedar in a garden...the smell, the rustic quality...I love it. Speaking of Lowes, have you tried out their pick up service? So good. Order online and it's ready to be picked up at Customer Service in 20 minutes. Perfection. 


Last year we filled this pot with mint and chives. At the end of the season, I put it in the garage for the Winter. It took less than a week to come right back to life. Mint is practically indistructable. Always amazes me. 


We planted some lettuce early in the season and it's just starting to come out. Can't wait for fresh lettuce from the garden. Last year, I remember proudly serving a fresh salad to a guest only to discover a tiny worm in it. And that was after at least 3 washes and several trips through the salad spinner. Needless to say, not my finest moment.

This year we're growing:
three types of lettuce 
radishes
beets
two types of tomatoes
green beans
sugar snap peas
zucchini
yellow summer squash
eggplant
cucumber
red peppers
hot peppers
herbs

Fingers crossed, we'll be enjoying the fruits of our labor all Summer. 

linking in with:
Met Monday

until next time,
Read more ...

Brioche

If you saw my Mother's Day post, you know that I was treated to some wonderful homemade brioche French toast for breakfast on Sunday. Of course, homemade breakfast, not made by me, is always a treat. But homemade bread as well - now that really is special. 


As you know, Mr. DD has really taken to the bread baking as of late. The girls and I are lucky enough to be the recipients of freshly baked Boules on a weekly basis, which I love. But who doesn't like a little change every once in awhile...variety is the spice of life, after all. Bring on the brioche.

{boule}

Brioche is basically a sweet bread, containing both eggs and butter. Butter, lots of butter. This recipe came from, The Bread Baker's Apprentice, by Peter Reinhart. There were 3 options, depending on how much butter you wanted to add: Rich Man's, Middle Class and Poor Man's. We went Middle Class, all the way.


This was no easy feat. There was the dough making on Saturday, followed by the 5am wake up call on Sunday to form the loaves and allow them to proof in time for a 10am brunch. Needless to say, I felt pretty special. 


Fortunately, we had a whole day in the garden to burn off the French toast and make room for the pork belly we had for dinner. Oh yeah, it was good. 


Sponge
1/2 c bread flour
2 tsp instant yeast
1/2 c luke warm whole milk

Stir together the flour and yeast in a large mixing bowl. Stir in the milk. Cover with plastic wrap and ferment for 30 -45 minutes.

Dough
5 large eggs, slightly beaten
3 c bread flour
2 tbs granulated sugar
1 1/4 tsp salt
1 c unsalted butter, room temperature
1 egg, whisked for egg wash

In the bowl of an electric mixer, add the eggs to the fermented sponge and whisk until smooth. In a separate bowl, mix together the flour, sugar, and salt. Add the dry ingredients to the bowl with the sponge and egg mixture, mix on low speed for 2 minutes. Let rest for 5 minutes. With the mixer on medium speed, gradually add the butter. Once the butter is incorporated, continue to mix with the dough hook on low speed for an additional 6-8 minutes. 

Move the dough onto a lightly oiled piece of parchment paper and form into a 6 x 8 square - we did this in a brownie pan.   Cover with plastic wrap and allow to ferment in the refrigerator for at least 4 hours, but preferably overnight.

When ready, divide the dough into two equal parts and form into loaves on a floured surface.  Note, this dough can get stick pretty quickly, so it is important to do this step when the dough is cold.  To form the loaf, stretch the dough into a rough rectangle, about 8 inches long (or the length of your bread tin) and 3-4 inches wide.  Fold the dough over lengthwise into thirds, like you would a letter. Roll the dough to seal the seam and put into a lightly greased bread tin.  Let proof for about 2 hours or until the dough doubles in size.  Brush the top with egg wash and proof another 30 minutes while preheating the oven to 400 F.  Bake for 35-45 minutes.  The bread should be golden brown on top.  Our loaves started to get a little too dark, so we covered it with foil for the last 10 minutes.

Remove from the tin immediately after baking and let cool on a rack.  

{Thanks Mr. DD for your interpretation of this recipe and a wonderful Mother's Day weekend! }


until next time,
Read more ...

The Great Curtain Debate

So, you may remember that sorting out window treatments in our master bedroom was high on my wish list. You see, we have 4 windows in our room and only two have treatments. 
Hmm...interesting, Liz, interesting.

{see, check out the window on the far right - nothing but a shade! Oh, you never noticed - that's odd. So unlike me to have never pointed it out...}

Why, yes, it is. A little back story of how this came to be...Back in the day, almost 3 years ago now, when we first worked on our bedroom I didn't know how to handle two of our windows. One was over a dressing table and the other was over a radiator, both next to built-in cupboards. No where to hang a panel...so, I did what any fear-frozen girl would do and decided to deal with it later.

{now}

As you may expect, now is later and here's my new problem. Restoration Hardware has discontinued this color way. Why, I ask you, why? What is wrong with yellow, people? It's constantly on the outs, but I continue to love it. Perseverance. 

Anyway, this little discovery left me in a tail spin trying to figure out what to do. Of course, I looked to match the existing fabric, but to no avail. So far nothing. 


Back to the drawing board...ie, Pinterest. Which is where I came across the idea of using one panel per window, essentially framing the windows on either side of the bed. 


So, I'm giving it a try to see how I like it. Me, being the self described Queen of Coziness, thinks it looks a bit bare. But I am starting to get used to it. I'd love to know what you think.

Please ignore: the wrinkled curtains {I also added curtain rings instead of using the rod pocket, as before}, the new hole in the plaster wall where I hung the painting too high, and the hideous, now exposed curtain rods. This is an 'in progress' image, after all. 

{I'm also testing out a slightly new location for the loveseat}

What's the point of all this? Well, if I decide I can live with one panel per window, that frees up the other two existing panels, which could be used to cover the remaining windows. 


As I explained to Mr. DD, buying two new curtain rods is a lot more cost effective then all new window panels. 

So, do tell. What do you think?


until next time, 


Read more ...

Chair Restoration: Paint and Upholstery

Hopefully you aren't getting too sick of this chair just yet because I've got a bit more to cover. Namely, paint and upholstery.


{need to catch up? click here for the reveal and re-tying springs}

As you can probably tell, I choose to reupholster my chairs in a loose weave burlap fabric. Due to the weave of the burlap, I did not remove the existing fabric. But I did remove the existing trim, which I would consider step 1 of this stage of restoration.


Next up, paint selection and application. 

I knew I wanted a distressed paint treatment for these chairs because they were already in pretty shabby condition. So, I went with my favorite standby: Milk Paint in light cream. 


Milk paint is a finicky one for so many reasons...you mix your own paint, first of all. Not the best for consistency. 

I do like that you don't have to prime first and of course, it's non-toxic.

But, it really does have a mind of it's own. It distresses itself. Literally, sticking some places and not others. I really don't understand it, but I do love how it looks. 


For this project, I used 2 light coats, letting it dry overnight between coats. A quick, light sanding exaggerated the naturally distressed look. And finally, one coat of clear wax added a nice richness to the exposed wood and provides a protective finish for the milk paint.


Ok, on to the new upholstery. Now, as I said in my first post about this chair, I've never taken on such a big project. I've recovered a dining chair and that's about it. That being said, this is probably the next step after a simple dining chair. 


I started on the back, by simply stapling the fabric at the top, bottom and both sides. Making sure to hold it tight. Then fill in with more staples, where needed. Triming off the excess fabric. Sounds pretty simple, right? Probably because it was. 


It got a bit trickier around the arms of the chair. Cut, fold, tuck, staple. Not much more to it. 
Did I mention that I did this with just a plain, old, chunky staple gun. Of course, I'd love a fancy one, but I don't think extensive reupholstering is in my future. We'll see. 


And lastly, my favorite part, the trim. Make sure you choose something wide enough to cover your staples. I went with a simple, cream woven trim. Then I hot glued it in place. Certainly goes along way to make this project feel like a professionally completed job. 


That's all she wrote, folks. 
It's the end of the story of these formerly sad and neglected, now mostly shabby, slight chic chairs. 


until next time, 
Read more ...
Related Posts Plugin for WordPress, Blogger...

Lijit Ad Wijit