Designing Domesticity Our Home Projects Food Services Shop About

Play Date Anyone?

Ok, we made it. The playroom is finished - newly designed, organized and hopefully, fully functional. 
Did I tell you I'm pretty happy this project is over? 
I can't really explain it. Just happy to be done.


Who wants to play dress-up? We haven't hit the princess phase yet (yeah), which is just fine by me. So our version of dress-up is really just halloween costumes. She doesn't seem to mind. You know what they say, ignorance is bliss.


This guy is always ready to play. Even when I'm not, thankfully.


I picked up this kitchen at a local yard sale for $20. Best money spent. EVER! Do you know what these things usually retail for? Ridiculous. Why are kids toys so expensive? I mean, really.


We've come a long way, baby. 
I think we're all pretty happy this isn't the view we see when we come downstairs anymore.


So, who wants to come play? We're booking dates now. 

Linking in with:

Until next time, 

Read more ...

Creamy Parsnip and Apple Soup

I know, I know, I know - I promised you a walk through of our newly designed playroom - I am sure you all have been waiting around with baited breath. But here's the situation - I'm sick, my girls are sick, the weather outside is frightful {gray and yukky = no light = not very good pics} - so i'm pulling a little switchero and posting about this fab soup I made earlier this week. 

It's just that kind of week; the kind of week when soup is what you need and soup is what you get.

Creamy parsnip and apple soup, via.

Admit it, that looks good. And the good news is - it's super easy to make AND my 3.5 year old ate two whole bowls...and this girl is the pickiest eater ever.


Melt 2 tbs butter in a large pan with 1 tbs oil

Add in:
2 medium onions, chopped
1.5 lbs parsnips, peeled and chopped

Cook over medium heat for about 15 minutes, stirring occasionally, until onions are translucent.

Add in:  
3 large cooking apples {I used granny smith}, peeled, cored and chopped
2 cloves garlic, chopped

Cook for an additional 2 minutes.


Pour over 1 liter of chicken/vegetable stock
Cover and simmer for about 20 minutes, or until the parsnips are soft.


Off the heat, emulsify with a hand blender or regular blender.


Add about 5 oz milk to reach desired consistency.
Season with salt and pepper to taste.


I served mine with croutons,  chives and a little sprinkle of fruity olive oil. It definitely hit the spot - just what the doctor ordered.

Weather permitting, I'll be back with some pics of the playroom. In the meantime, enjoy some soup! And have a great weekend.

This recipe was found on BBC.co.uk, from The Hairy Bikers.

Until next time, 
Read more ...

LoN knock-off Art Clips


You're probably familiar with the Land of Nod and all their cute kids stuff. I love wondering around their shop in search of inspiration. The other day, I noticed these:

art clips, via

So cute, but seriously, $15 for some string and clips? I think we all know we can make that quite easily!


Start with a large headed nail.


Attach a cute cover, of your choice, with liquid nails. In this case, I used wooden stars that I picked up at Michael's and painted blue.


I've used three in a row, but I am sure you could make this as long/short as you would like.


Connect each star with yarn, knotting onto each nail.


Attach clips.
I mean, could it be any easier?


A great place to display art. Not to mention a makeshift drying rack for all those little works of art.
{Really into the sticker mosaics at the moment; thanks again Aunt P}

Next up is the final walk through. I'm not going to lie to you, I'm pretty happy this project is over. More fun to use the room than decorate it, I think.

Until next time, 
Read more ...

Kids Art


The other day, while wondering around Michael's hoping for some playroom art inspiration, this idea came to me. Nothing revolutionary, but a fun project all the same.


It started with a pile of letters, that I sprayed with primer.
{Thankfully we had a couple of mild days last week so I could spray outside.}


Then I requested the help of one very excited little girl.
{By far the easiest part!}


This little activity managed to occupy a whole morning.
{Could be the best part!}
Check out that concentration.


A couple of coats later, we ended up with these. 
{I accidentally picked up finger paint, so not exactly the look I was going for, but it works.}


Liquid nails makes quick work of adhering the letters to left over MDF, that I painted white, from the Chalkboard project.


I probably should of paid attention to what colors we were painting each letter, but I didn't. 
{Once a three year old starts painting, you just go with it!}

She's so proud of her words; loves to "read" them every time we go to the playroom. And I love the memories associated with this little project.

One more little project coming your way and then it's time for the tour. Hope you'll stick around.

Linking in with:

Until next time, 
Read more ...

Unexpected Storage

In the linen closet? That's right, more storage in a closet specifically made for storage. Who knew! But if you're like me, living in a house with very few actual closets, you know you have to make the most of what you have. 


So what's the solution?


A shoe storage bag placed on the inside of the closet door. It's as simple as that. Actually, I came across this idea in a This Old House article and as soon as I read it I thought to myself - why didn't I think of that? Genius. 


I've filled mine with some of my must haves like Shaklee Germ Off Wipes, some of the bulkier toiletries, as well as some rarely used items like seasonal towels.

I'm loving this solution for a variety of reasons - the top two being: it's storing all those little items like wash cloths that take up so much space and it's keeping my toiletries organized so I know when I need to replace something.


Here's how we were looking before...everything fit, but there wasn't much room to grow. 


And now.

Ah, that makes me happy. Even if these nicely folded towels and sheets only last through one more wash. At least there will be more room for the future messily folded towels and sheets!

Ok, well, I think I have exhausted this topic for now. But worry not, I'll be back with more unexpected storage in the future. 

It's back to more work in the basement playroom for us this weekend - what are you up to?

Until next time, 
Read more ...

Art Center


In my last post, I shared our new chalkboard, which acts as a very kid friendly focal point in our playroom. I went on to say that I believe kids rooms can and should include good design. But alas, not all aspects of a kids space can be more than pure function. Which brings me to our art center.


A simple white shelving unit, brought in from our family room (which incidentally, is also in the basement just across from the playroom), filled with baskets containing all sorts of arts and crafts excitement.

Also moving to the playroom is the refurbished table and chairs, which she received as a Christmas gift last year. 


Above a simple art display area.

You might also notice that we've added colored foam play tiles to the floor.


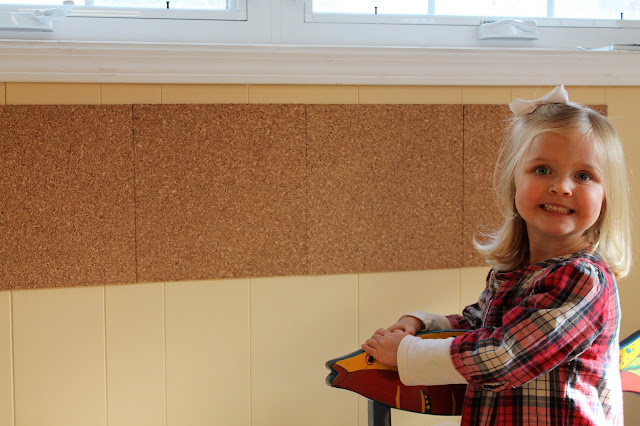
Cork squares from Target.

Don't you just love a 3 year olds smile - so natural!


Target also came through in the pinch with their $1 baskets for crayons, pencils, markers and stickers.


So there you have it. The art center, in all it's glory!

It doesn't take much to make a kid happy after all. 

Surprisingly this playroom has come together pretty quickly. I've got a couple little bits left though, like: creating more art display, creating kid participation wall art and I'm even debating adding something to incorporate a bit of stage presence. We'll see..

Until next time, 
Read more ...

A Very Kid Friendly Focal Point


A wall-spanning chalkboard has been in the plans for the new playroom for a long time. 

Whenever we visit my parents in Cincinnati, we always go to a restaurant that has a gigantic chalkboard that my daughter loves to draw on. Perfect focal point for a playroom. Who says kids rooms can't incorporate a bit of design?


 We determined a location on the back wall for our little installation; got our measurements and headed off to Lowe's. Actually, I decided to task Mr. DD with this little project, so he headed off to Lowe's, measurements in hand (3'x6').


One large piece of MDF and a couple pieces of trim later, the studs were found and the levels were taken. We're ready to do some actual work around here.


Here's an extremely flattering photo of me actually doing said work. What a rarity to get out from behind the camera. Honestly, you must think that Mr. DD does all the heavy lifting around here. 


After one coat of primer and two coats of chalkboard paint (sanding between each coat) we were left with this. It's definitely calling out for a bit of trim, don't you think? Me too.


We chose to place the trim directly on top of the MDF, initially gluing it on using Liquid Nails and then applying finishing nails.


 The corners were cut at a 45 degree angle using the mitre saw. We also applied additional trim across the bottom to act as a chalk tray. 


Colored chalk was a must!


Ah, a very kid friendly focal point.


Best of all, it provides hours of entertainment.

I'll be back with more updates to the playroom soon - we got quite a bit accomplished this weekend!

Linking in with:

Until next time, 

Read more ...
Related Posts Plugin for WordPress, Blogger...

Lijit Ad Wijit