Designing Domesticity Our Home Projects Food Services Shop About

Decisions, Decisions, Decisions - I can't seem to make one!

I'm back lamenting on my ongoing struggle to create a new color scheme in the living room/breakfast room with fabric.

Last I left you, I thought I had found a winner with the below fabric, which I envisioned as lovely window panels.


Well, evidently, so did everyone else as this fabric is now backordered until August! 
Humph.
Not that that is the reason that I am unable to make a decision.


It has a lot more to due with our new built-ins and how little green you actually see from the living room now.
It suddenly seems silly to base entire scheme off of a 1/3 of a wall that can only be seen from one side of a room. 

Furthermore, if I ever want to change things up in the living room, having only one color in the window panels certainly doesn't give me a lot of options.

Thus, the search continues.


I recently stumbled across this striped beauty, which encompasses all of my colors - the yellow from the living room walls, the rusty red of the couch, the green from the breakfast room, and blue, which can be found in our current rug.

So what's holding me back? 
I'm not sure really.
I never really considered myself a stripe person - whatever that means.
And I worry that it will be just a little too dark.

But I just can't envision a floral on the window panels either. 

Where does this leave me?

 A wise woman (my Mom) suggested I buy 3 yards (approximate yardage per window panel) and hang it up to see if I really like it. 
Much easier to digest a mistake of around $60 than the cost of all the panels.

Decisions, decisions, decisions - I just can't seem to commit.


That being said, I did actually manage to commit to this lovely suzani fabric which I hope to transform into throw cushions for the couch.

Paired with the green geometric above, which will also hopefully be transformed into throw cushions, my living room is already taking on a lighter feel.

At least in my mind!

So, tell me, what do you think of the stripe? 

Until next time,
Read more ...

Kitchen Sneak Peek

I think it's safe to say that we are very near completion on our kitchen renovation!
Just a couple bits and bobs to mark off the check list for the contractors.

Here's a sneak peek of where we are to date...


The cabinets have been primed and painted.


The counter-tops have been installed.


And the backsplash has been installed.


So what's left?

Hardware.
Priming and painting the trim and walls. 

And of course, 
decorating! 

And moving back in.

Next time I post about the kitchen, I should be showing off the reveal. 
Wish me luck!

If you'd like a review of where we started and where we've been, click here.

Until next time, 
Read more ...

Breakfast Room Inspiration and Paint

This weekend was filled with painting - at least for Mr. DD, who took it upon himself to sort out the breakfast room. 
All in an effort to get us moved upstairs sooner than later.

Funny how he has reached his limit before I have and I am the one that is here all day, every day! 

Last I showed you the breakfast room we had newly built built-ins a plenty. 
Lots of naked wood in need of covering!


Gotta love the action shots of Mr. DD painting - what a trooper! 
Definitely a special thanks for all his hard work.


All done!


Almost like they have always been there!


I can't wait to get the table in place!
And actually start using this room.

Anywho, now that it's all painted and looking lovely - it's time to set my mind upon decorating, which of course, is my favorite part!


Something about this image from Pottery Barn stopped me in my tracks when I first saw it. 
It's warm and cozy, yet light and airy. 
I love the dark, warm, wood tones against the lighter wall colors.
And of course, the window seat...

Inspiration has been found.

Stay tuned to see how I make it my own. 

Also, check back later in the week for a sneak peek of our almost completed kitchen!

Linking in with:

Until next time,
Read more ...

Saturday's Kitchen: Island Pork Salad

As promised earlier this week, I tried out a new recipe for Father's Day and really liked it. 
You know what that means, time to share it with you!


For pork
  • 2 teaspoons salt
  • 1/2 teaspoon black pepper
  • 1 teaspoon ground cumin
  • 1 teaspoon chili powder
  • 1 teaspoon cinnamon
  • 2 pork tenderloins (2 1/4 to 2 1/2 pounds total)
  • 2 tablespoons olive oil

For glaze
  • 1 cup packed dark brown sugar
  • 2 tablespoons finely chopped garlic
  • 1 tablespoon Tabasco

For vinaigrette
  • 3 tablespoons fresh lime juice
  • 1 tablespoon fresh orange juice
  • 1 tablespoon Dijon mustard
  • 1 teaspoon curry powder, toasted
  • 1/2 teaspoon salt
  • 1/4 teaspoon black pepper
  • 1/2 cup olive oil

For salad
  • 3 navel oranges
  • 5 ounces baby spinach, trimmed (6 cups leaves)
  • 4 cups thinly sliced Napa cabbage (from 1 medium head)
  • 1 red bell pepper, cut lengthwise into thin strips
  • 1/2 cup golden raisins
  • 2 firm-ripe California avocados

Prepare pork:
Preheat oven to 350°F.
Stir together salt, pepper, cumin, chili powder, and cinnamon, then coat pork with spice rub.
Heat oil in an ovenproof 12-inch heavy skillet over moderately high heat until just beginning to smoke, then brown pork, turning, about 4 minutes total. Leave pork in skillet.

Make glaze and roast pork:
Stir together brown sugar, garlic, and Tabasco and pat onto top of each tenderloin. Roast in middle of oven until thermometer inserted diagonally in center of each tenderloin registers 140°F, about 20 minutes. Let pork stand in skillet at room temperature 10 minutes. (Temperature will rise to about 155°F while standing.)

Make vinaigrette while pork roasts:
Whisk together juices, mustard, curry powder, salt, and pepper, then add oil in a stream, whisking until emulsified.

Prepare salad ingredients while pork stands:
Cut peel, including white pith, from oranges with a sharp knife, then cut oranges crosswise into 1/4-inch-thick slices. Toss spinach, cabbage, bell pepper, and raisins in a large bowl with about 1/4 cup vinaigrette. Halve, pit, and peel avocados, then cut diagonally into 1/4-inch-thick slices.

Assemble salad:
Cut pork at a 45-degree angle into 1/2-inch-thick slices. Line a large platter with dressed salad and arrange sliced pork, oranges, and avocados in rows on top. Drizzle some vinaigrette over avocados and oranges. Pour any juices from skillet over pork.


Cooks Note:

We actually grilled ours instead of baking - 'tis the season! We used aluminum foil to keep the pork from burning once the sugar glaze was applied.
This recipe feeds a crowd and would be great for a party!

As always, if you try it and like it please do let me know.

Until next time, 


Read more ...

Working with What You have - Outside, Part 2

You may remember my post a couple weeks back revealing the transformation of our secret lilac garden by adding only 3 new plants and filling in space with a variety of hostas from our yard...

Well, we've done it again.
This time on a slightly bigger scale!


Check out this previously barren gangway next to the screened-in porch.
Now it is alive with two varieties of hostas, rocks and ferns. 
Such an improvement!


This is the area to the left of the new grill mini-patio.

More hostas, rocks, myrtle ground cover, lily of the valley, ferns and pachysandra ground cover.


For this large space, I did purchase 3 lady's mantel, 1 lenten rose, and 3 astilbe plants - all from Home Depot. These plants were chosen for their shade loving hardiness and to coordinate with the existing plants. A small investment of around $50 for such a large space.


We even managed to incorporate our existing bird bath as well as re purpose a cement bird that previously lived in a Spring arrangement indoors.


I love the play of dappling light in our newly rejuvenated shade garden. 


What an improvement over last year when this space included just 5 plants.

Special thanks to my parents who helped us to design this new space and helped to move a lot of the plants. You just gotta love free manual labor!

Until next time, 
Read more ...

Rounding out the color scheme

You may remember my new paint color scheme reveal from a couple of weeks ago, if not, click here for a recap.


This image shows all the major contenders - sofa, wall color in living room and breakfast room. Our old curtains
 are there for reference - proving to Mr. DD that they just don't work anymore! 
Time to make a change...

For the last couple of weeks I've been searching high and low for either ready made panels or fabric  - any type of inspiration really! 

I have samples galore...


This was my first love. 
Greens, yellows, corals - all the colors I want to highlight in this space. 


Coupled with these fabrics, I really felt like I was getting somewhere. 

Then when my parents were visiting a couple of weeks back, my Dad casually asked if I didn't already have that fabric somewhere. 

What? 
Did I have it!?!? 

Basically, totally innocently, stating that I have used similar things in the past - which is what I am trying to get away from here. Back to the drawing board.

I knew my plan was to lighten things up, so I went in this direction:


Similar colors but the creme background really helps to lighten things up.

Unfortunately, when my online sample arrived the fabric just had too much sheen to it for me. 
Note to self, don't forget to check the material!


My reject pile!
Can you tell which one I forgot to check the material on? 

Ordering sample fabric online can become a bit addictive!


After loads of trial and error, I think I have finally found a winner! 

It's young, light, neutral and somewhat modern, but still traditional. 
Everything I am trying to achieve with my new color scheme!
  
This whole redefining your style thing sure takes awhile!

So, what do you think? 
Am I on the right track?

Now onto pillow fabric.

Until next time, 
Read more ...

Summer Front Porch Pots

Well, hello there!

Sorry to have missed you for my regular Monday post. 

We had a great weekend visiting family, but a hectic return and a busy Monday. Crucial design decisions had to be made, appointments couldn't be missed and long awaited birthday presents finally arrived and just HAD to be set up today!


No matter how crazy it's been lately, I love to stop and enjoy our front porch pots.

Come on by and take a look!


I went with a white and green theme again this year - some people love blue and white - me, I'm a sucker for green and white. Every time! 


The big change this summer is the addition of a third pot, complete with topiary.
English ivy, white impatiens, white petunias, and climbing white clematis.


The two smaller pots hold a variety of white petunias, vinca vine, white geraniums, and white impatiens.


You know what they say, you've got to make time to stop and smell the flowers! 
And this evening, I did just that. 

Hope you have made time in your day to enjoy all that summer has to offer.

Until next time, 
Read more ...

Weekly Kitchen Update No. 4

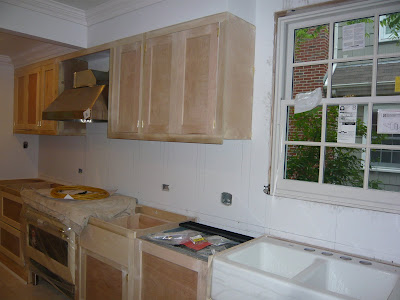
Well, friends, I am happy to say that our kitchen is nearing completion. It's so close I can taste it! Of course, in reality, we have at least another 2-3 weeks, but details, details!

During our last update, I shared images of the cabinets without doors. 


As of yesterday, we have doors! 

The wet bar area.


And the buffet area.


The refrigerator has received its new custom panel doors.


The new back door has finally arrived and been installed!


The hood is in place, and the dishwasher has its new custom panel as well. 


Our new two bowl, apron fronted, farmhouse sink (if you'd like a reminder on all we had to choose from in terms of sinks, click here) has found its home under the new kitchen window.

Lots of progress in a weeks time!
I'm sure you can see why I am excited.

What about you, making big progress on any projects around your house?

 Next up: completion of the cabinet inserts, priming and painting the cabinets, and counter-top install! 
Fortunately, we managed to select a counter-top, but the paint color is still under discussion - wish me luck!

Until next time, 
Read more ...

Working With What You have - Outside!

Perhaps you remember this little garden that I planted last year? 
Click here for a reminder.

Lilac garden before

I'm pleased to say that everything came back this year, but it was looking a bit sparse. 
Not exactly the secret garden that I had hoped for.

Not wanting to spend a lot of money with our massive kitchen project still underway, I purchased three grass plants for added privacy and decided to take a look around our yard and see if there was anything that I could use to help fill out the space.


Have I ever shared an image of our hosta boarders? 
The previous owners had over 50+ hosta plants - now that's definitely something to work with!

Let's take a look at our newly planted space.


View from the front of the house, looking back toward the patio.


Looking down the path. 
(After of first image.)


One more time - lilac garden before


Lilac garden after

So, what exactly did we do?

We broke up the obvious lines of plants, grouped plants in closer proximity in groups of 3, moved the bigger plants closer to the foundation of the house, and added loads of hostas - both variegated and green. 


View from the screened-in porch toward the driveway.

So, what do you think?

We are loving the new look; and with a price tag of only $20 and a lot of manual labor, we couldn't be more pleased.

Of course, we'll see what next year brings! 

Until next time, 
Read more ...

Porch Planter Updated

Last year I inherited this wicker plant stand, which had been my grandmother's and had lived in my childhood bedroom for years.


Ah, memories! 

I was so excited to receive it that I immediately set it on the front porch and promptly forgot about it.

Needless to say, this year, it was looking a little worse for the wear.

Time to make use of my favorite methods of transformation - spray paint!

A couple of coats of white paint followed by a clear top coat to protect against the elements...


And she's back to her former beauty! 

Paired with one of my pineapple finials and a lantern, she is now ready to welcome all who enter through our front door.


What about you - transform anything with spray paint lately?

Linking in with:


Until next time,
Read more ...

Saturday's Kitchen: Red Snapper with Thyme, Tomatoes and Olives

I'm finally back with another Saturday's Kitchen recipe for you!

I know it's been ages, but what can I say, I've been confined to a temporary basement kitchen with a hot plate and a toaster oven. Of course, this doesn't mean I haven't been cooking - just means I haven't tried a recipe that I felt was good enough to share.

Until...


Red Snapper with Thyme, Tomatoes and Olives
fresh from the toaster oven!

Ingredients

  • 3 large plum tomatoes, coarsely chopped
  • 1 shallot, chopped
  • 2 teaspoons chopped fresh thyme
  • 2 tablespoons olive oil
  • 2 6- to 7-ounce red snapper fillets
  • 10 Kalamata olives or other brine-cured black olives, pitted, halved

Directions
  • Combine plum tomatoes, shallot, and chopped thyme in small bowl. Season to taste with salt and pepper. 

    Cut 1 sheet of aluminum foil about 18 inches long. Place on work surface. Drizzle 1 tablespoon olive oil in center of aluminum foil. Place red snapper fillets side by side in center of aluminum foil. Top with tomato mixture. Sprinkle with olives. Drizzle fish with remaining 1 tablespoon olive oil. Fold foil over, enclosing contents completely and crimping edges tightly to seal. (Can be prepared up to 6 hours ahead; refrigerate.)

    Preheat oven to 450°F. Place large baking sheet in oven and heat 10 minutes. Place foil packet on heated baking sheet. Bake until fish is opaque in center, about 15 minutes. Remove from oven; let stand 5 minutes. Open foil packet over bowl to catch juices. 


    We served ours with multi-colored roasted marble potatoes and roasted asparagus. 
    Yum!

    Give it a try - you won't be disappointed.

    Until next time, 
Read more ...
Related Posts Plugin for WordPress, Blogger...
Lijit Ad Wijit