
Designing Domesticity Our Home Projects Food Services Shop About
Showing posts with label kitchen reno. Show all posts

Kitchen: It's all in the details...

First off, I'd like to say thanks to everyone for all the lovely comments about our kitchen. 

Essentially, we went about this project without a formal plan on paper, just a vision in our heads - there were many moments of despair, but we powered through and truly love the results. 
I'm so pleased that many of you seem to as well!

Today, I thought I'd share some additional information concerning the thought process behind some of the decisions and selections we made. And of course, I'll be including the source list.

Hopefully this will satisfy any remaining curiosity out there!
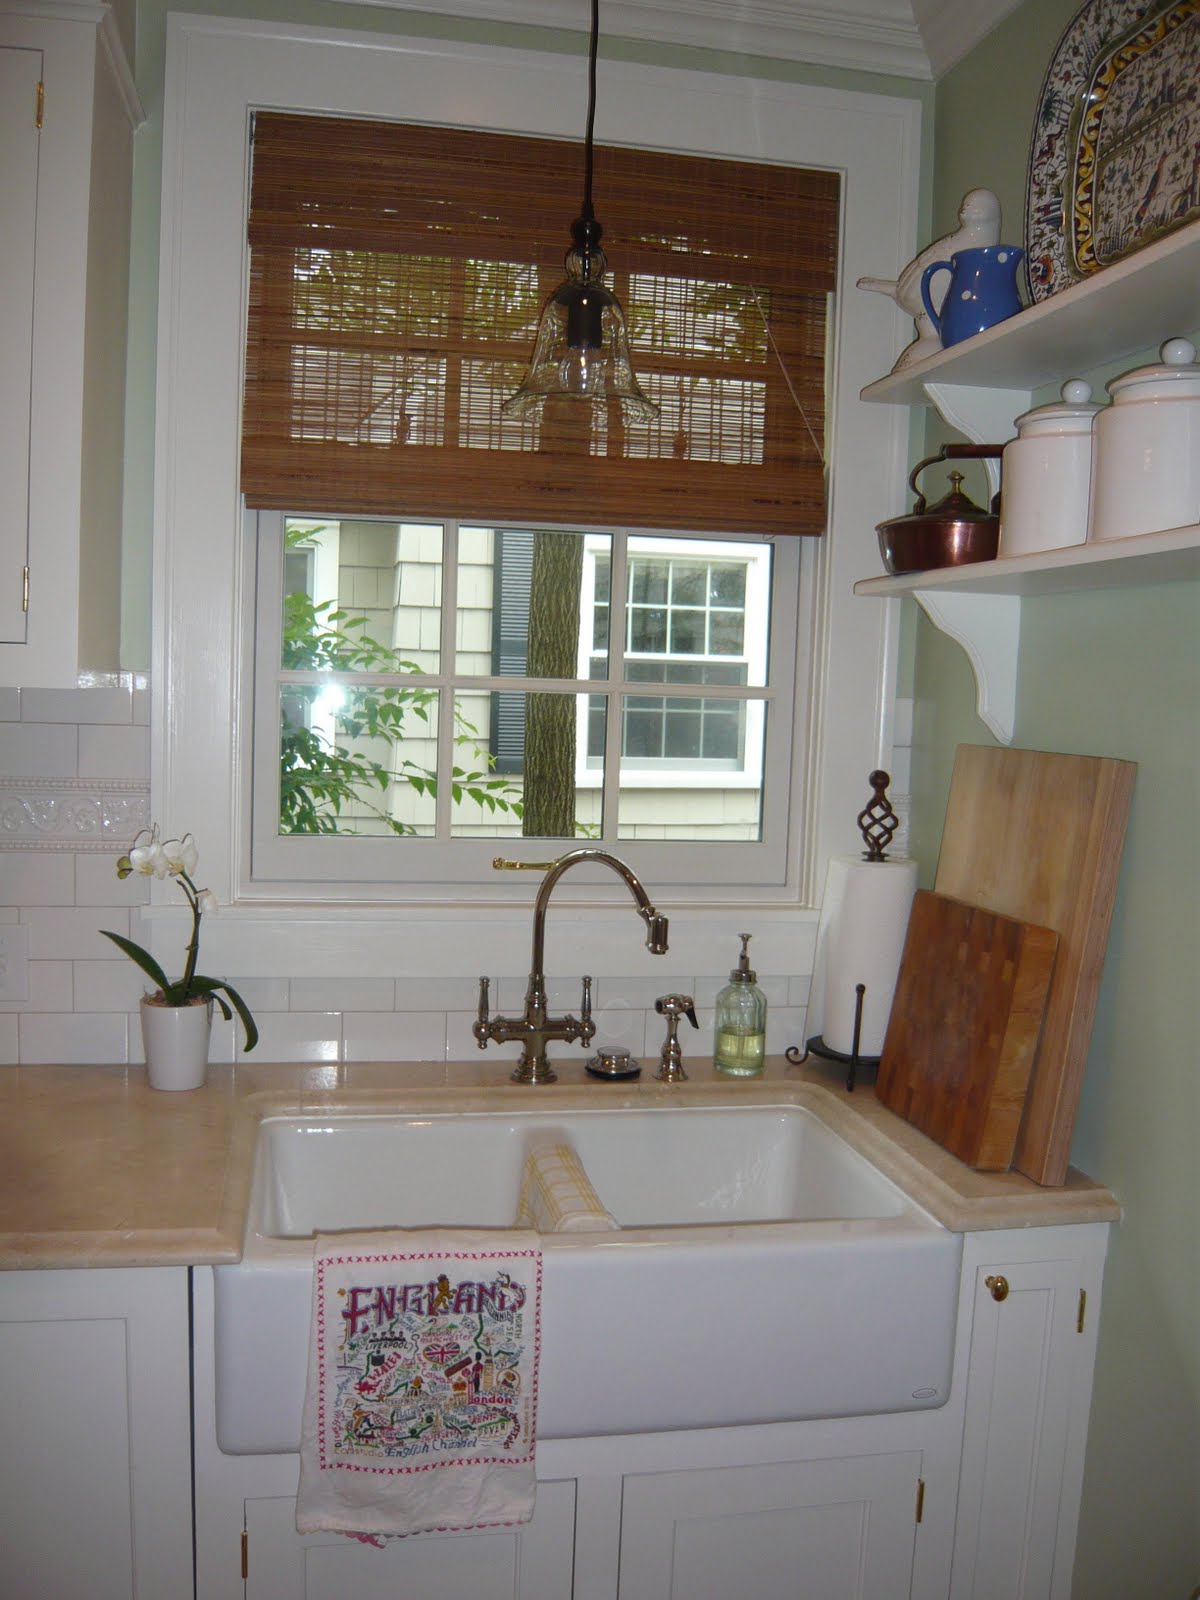


Why did we choose a double bowl sink? 
Once the final layout was in place, we realized that there would be very limited space to the left of the sink.  Meaning, there wouldn't be a big enough area to dry dishes on the counter-top...and the idea of a double sink was born. 

What happened to the bridge faucet concept?
The story behind the faucet selection is a simple one. It's the only faucet that we could both agree on! 
faucet: Kallista in nickle

Window
Why would you downsize the only window in your kitchen?
Again, this was not a decision that we made quickly. But ultimately, every kitchen needs storage and that was our priority. Plus, adding a symmetrical cabinetry on either side of the range hood made the most sense, aesthetically.

Sources
Pendent Light - Pottery Barn
Roman Shade - Overstock
Tea Towel - I received these from a dear friend, who gifted them just because - don't you love friends like that! They can also be found here, cat studio.
Paper Towel Holder - HomeGoods


Why did you decide to incorporate open shelving?
I love to accessorize a kitchen, but I didn't want to clutter the counter-tops, open shelving is the perfect solution for this dilemma.

Sources
Copper Kettles - antique, pre existing
White Canisters - Williams Sonoma, pre existing
Provincial Platter - Williams Sonoma, pre existing
White bird - Pottery Barn, pre existing
Blue and White Pottery - per existing, all from eBay, T.G. Green & Co. Cornishware
Wall Color- BM Guilford Green


What was the jumping off point for the entire kitchen?
The stove!
As you may remember, we actually purchased this stove almost a year before our project kicked off. We fell in love with the look and functionality, then it was just a matter of making it work in the kitchen!

Source List
Kettle: Le Creuset, pre existing
Pot Holder: Cath Kidston, pre existing
Cabinet Paint: BM White Down
Counter tops: Crema Marfil marble, antiqued finished


Source List
Backsplash - Lowe's
White Canister - pre existing
Green Canister - pre existing
Cherry Pitcher - Crate and Barrel
Basket - HomeGoods


How did you decide on polished brass hardware?
Truth be told, I wouldn't consider myself a polished brass kind of girl, but in this case, it really does work in the kitchen. It ties in the two metals of the stove, is in keeping with the hardware throughout the rest of the house, and adds to the old world feel we were going for in the kitchen.

Why did you remove the window on the South wall?
We knew we wanted to include a pantry and the area next to the fridge was the ideal space, but the existing window would of made this layout impossible. The window really had to go - no other option, really!


Why did you decide to make the the buffet area such a narrow depth?
In this area, the lower cabinets are 18" deep and the upper cabinets are 12" deep. The whole kitchen isn't terribly wide, so we choose to make the buffet narrow depth to open up the entire kitchen. 
It really does make a huge difference over the previous layout.

Source List
Wire Fruit Basket: Crate and Barrel, pre existing
Toaster Oven: Breville


How did you decide to incorporate a wet bar?
This was also one of those decisions that we really went back and forth on. Should we make this whole area into a pantry? Or should it be a butlers pantry? Or a wet bar? 
In the end, Mr. DD took the lead on this one. He wanted the bar and he got it.

Source List:
Sink: Hammered Nickel, Overstock


Source List
Center Rug - Antique Turkish Rug, pre existing
Sisal Rugs - Overstock
Chairs - pre existing

Ok, well, that was quite the post! 
I think I have pretty much covered the project now. 
Phew!

Want to see the kitchen 1.5 years later? click here

Until next time, 
Read more ...

The Big Kitchen Before and After Reveal

After almost 3 months of constructions, our kitchen is finally complete.
And we couldn't be happier with the results.

Take a peek!


After


Before


New window and pendent above the double bowl, apron fronted sink.


36" range and custom hood.


Before


Custom panel fronted built-in fridge and pantry.


Before


Built-in buffet area.


Before


Wet bar.

Well, there you have it. 
The new and improved kitchen. 

There's a lot to take in...I hope you enjoy!

Other posts you might like:


Linking in with:


Until next time, 
Read more ...

Kitchen Sneak Peek

I think it's safe to say that we are very near completion on our kitchen renovation!
Just a couple bits and bobs to mark off the check list for the contractors.

Here's a sneak peek of where we are to date...


The cabinets have been primed and painted.


The counter-tops have been installed.


And the backsplash has been installed.


So what's left?

Hardware.
Priming and painting the trim and walls. 

And of course, 
decorating! 

And moving back in.

Next time I post about the kitchen, I should be showing off the reveal. 
Wish me luck!

If you'd like a review of where we started and where we've been, click here.

Until next time, 
Read more ...

Weekly Kitchen Update No. 4

Well, friends, I am happy to say that our kitchen is nearing completion. It's so close I can taste it! Of course, in reality, we have at least another 2-3 weeks, but details, details!

During our last update, I shared images of the cabinets without doors. 


As of yesterday, we have doors! 

The wet bar area.


And the buffet area.


The refrigerator has received its new custom panel doors.


The new back door has finally arrived and been installed!


The hood is in place, and the dishwasher has its new custom panel as well. 


Our new two bowl, apron fronted, farmhouse sink (if you'd like a reminder on all we had to choose from in terms of sinks, click here) has found its home under the new kitchen window.

Lots of progress in a weeks time!
I'm sure you can see why I am excited.

What about you, making big progress on any projects around your house?

 Next up: completion of the cabinet inserts, priming and painting the cabinets, and counter-top install! 
Fortunately, we managed to select a counter-top, but the paint color is still under discussion - wish me luck!

Until next time, 
Read more ...

Weekly Kitchen Update No. 3 - Plus I need your help!

The kitchen is coming along leaps and bounds! 
We've had our set backs, certainly, but progress is definitely being made. 


As you can see, all the boxes along the West wall have now been completed!
And the appliances are in place.


Check out that stove! 
The starting point for this whole project.


To the right of the stove will be deep storage drawers, then the dishwasher and sink. 
Between the sink and the wall will be the much coveted platter storage. 
Can you tell I am excited at this stage??


The built in fridge flanked by the pantry, which as a side note, has turned out bigger than we could of hoped for - very happy with that outcome. 


So here's where I need your help. 
Now that the cabinet bases are in place we can move forward with the counter-top selection. 
The problem is, we can't decide which way to go. 
Mr. DD wants more contrast, I want less. 

Here are a couple of options we are considering, separated by the backsplash tile. The tea pot lid represents the stove color and the background tile is the actual floor tile.

Hope that makes sense.

So, what do you think - lighter with honey toned veining or darker all over honey color. 

Until next time, 
Read more ...

Weekly Kitchen Update No. 2

Well, the cabinet maker has been working hard for a little over a week and I've got some progress to show you. Truth be told this has been a very hands on experience for us - so much so that both Mr. DD and I have felt a wee bit unprepared. 

Yes, it caught me by surprise as well! 

But enough about all of that, I'll get to the pictures already.


We'll start in the new wet bar area. Here we'll have three upper cabinets and three lower cabinets, separated by a counter-top, sink and faucet.

The hole in the wall (at the left) is the existing laundry chute that we built around.


This is the view when standing in the main part of the kitchen looking into the wet bar area.


Moving on down the East wall, this is the area that I refer to as the buffet. There will be four lower cabinets, which are only 18" deep. There are a variety of upper cabinets all 14" deep, which will also hold our above the counter microwave.


The straight on view shows all the detailed upper cabinet configurations. 

OK, well, that about sums up the progress over the last week. It's going well, especially now that some of the major design decisions have been made, but of course, it's a slow and detailed process that we are eager to complete.

We're hoping the other side of the kitchen will be complete by the end of next week so we can go forward with cabinet paint color selection and counter-top selection as well. 
Fingers crossed!

Until next time,


Read more ...

Kitchen Floor - done!

Last I left you, we had a drywall on the walls and arch in our kitchen renovation. 
(Click here for a reminder.) 
And I believe we were all impatiently awaiting the reveal of the kitchen flooring!


Well, first things first, the coil for the underfloor heating was installed and mortared in place.

Remember all the flooring options I posted about here?

We ended up going with the lighter tumbled travertine four piece pattern.


An in progress shot!

I can't tell you how relieved we were at this point....I was having serious buyers remorse just after ordering and paying for all the tile. I started to think it was too light and too large of a format. When it arrived, the tiles looked huge in our small space and really light in color.

But then it was all in place...


And I fell in love with the pattern and the old world feel. 
It's exactly what we wanted. 
Just enough color variation for interest, but not too much to compete with our future countertops. 


Plus, after two coats of sealant, it's taken on a slightly darker tone. 

These pictures don't even do it justice! 

This little step is just making me more excited than ever for our cabinet maker to get started. 

By the end of this week, the really messy work should be completed and we'll regain our living room. We're working on a new furniture layout too...so stay tuned!

Linking in with Met Monday at Between Naps on the Porch.

Until next time, 
Read more ...

Weekly Kitchen Update #1

The kitchen project has been underway for just over two weeks now - and lots of progress has been made.
So far we've covered the demolition and the new opening and refinished floors. 
Click on the link for a recap!


Sorry about the dust flying around in this picture - it was taken after a week of heavy work. 
But it should give you an idea of the state our house has been in lately!

Anyway...
we've run into our fair share of unexpected issues - including two sets of hardwood floors resulting in a very uneven floor, a support beam that actually supported nothing, birds nests in the soffit, walls and ceiling in need of leveling.

By the time this picture was taken, the electric and plumbing had been updated, all the above issues had been rectified, and the walls were insulated.


Here's a clearer picture that shows the new, much smaller soffit and the new framing for the window above the kitchen sink. 

In other news, both our window and the new backdoor are back ordered and won't be arriving for at least a month - gotta love that!

The following pictures show the new drywall.


A couple more days of drywall sanding, laying the heated floor, tile, grout, etc and we'll be ready to start in on the cabinets.

Can't wait.

Until next time, 


Read more ...

Opening it up and Refinishing the Floors

Along with the kitchen remodel, we decided to open the wall between our living room and breakfast room as well as refinish the floors. 
Some might say, why take on so much? 
But we decided that if the house was already a disaster area, why not just make it worse!


Late last week, I walked in through the front door to find this.
That's all our living room furniture in our dining room!
Time to get the work underway.


I peeked around the corner and saw this...the new opening, looking from the breakfast room into the living room. 


Here it is, with the arch shape we requested to match the opening from the foyer to the living room. 


Next up, sanding down the floors.
When we bought the house, the living room had wall to wall carpet. Fortunately, the hardwoods underneath were in good shape, but the stain was a bit dated and didn't match the floors in the foyer and dining room.


Really making progress now.
And I have to say, they were pretty tidy. 
Nothing like the horror stories I've heard about sanding floors.
Phew!


Here they are all stained and looking lovely.
Again, looking from the breakfast room into the living room.


And the living room.

We literally can not wait to move all our furniture back into the living room and enjoy the new functionality and flow of the room.

Unfortunately, it will still be a while. 
Yet to come, drywall on the new arch and in the kitchen - you know what that means, here comes the dust! As if it hasn't been messy enough around here!

Later this week, I'll post your weekly kitchen update as well as some progress in the garden!

Linking up with Met Monday over at Between Naps on the Porch.

Until next time,
Read more ...
Related Posts Plugin for WordPress, Blogger...

Lijit Ad Wijit