Designing Domesticity Our Home Projects Food Services Shop About

Fencing It In

Have you finished your outdoor fall clean up yet?

We're making progress, but not quite there yet. Probably because this project suddenly became a lot bigger!

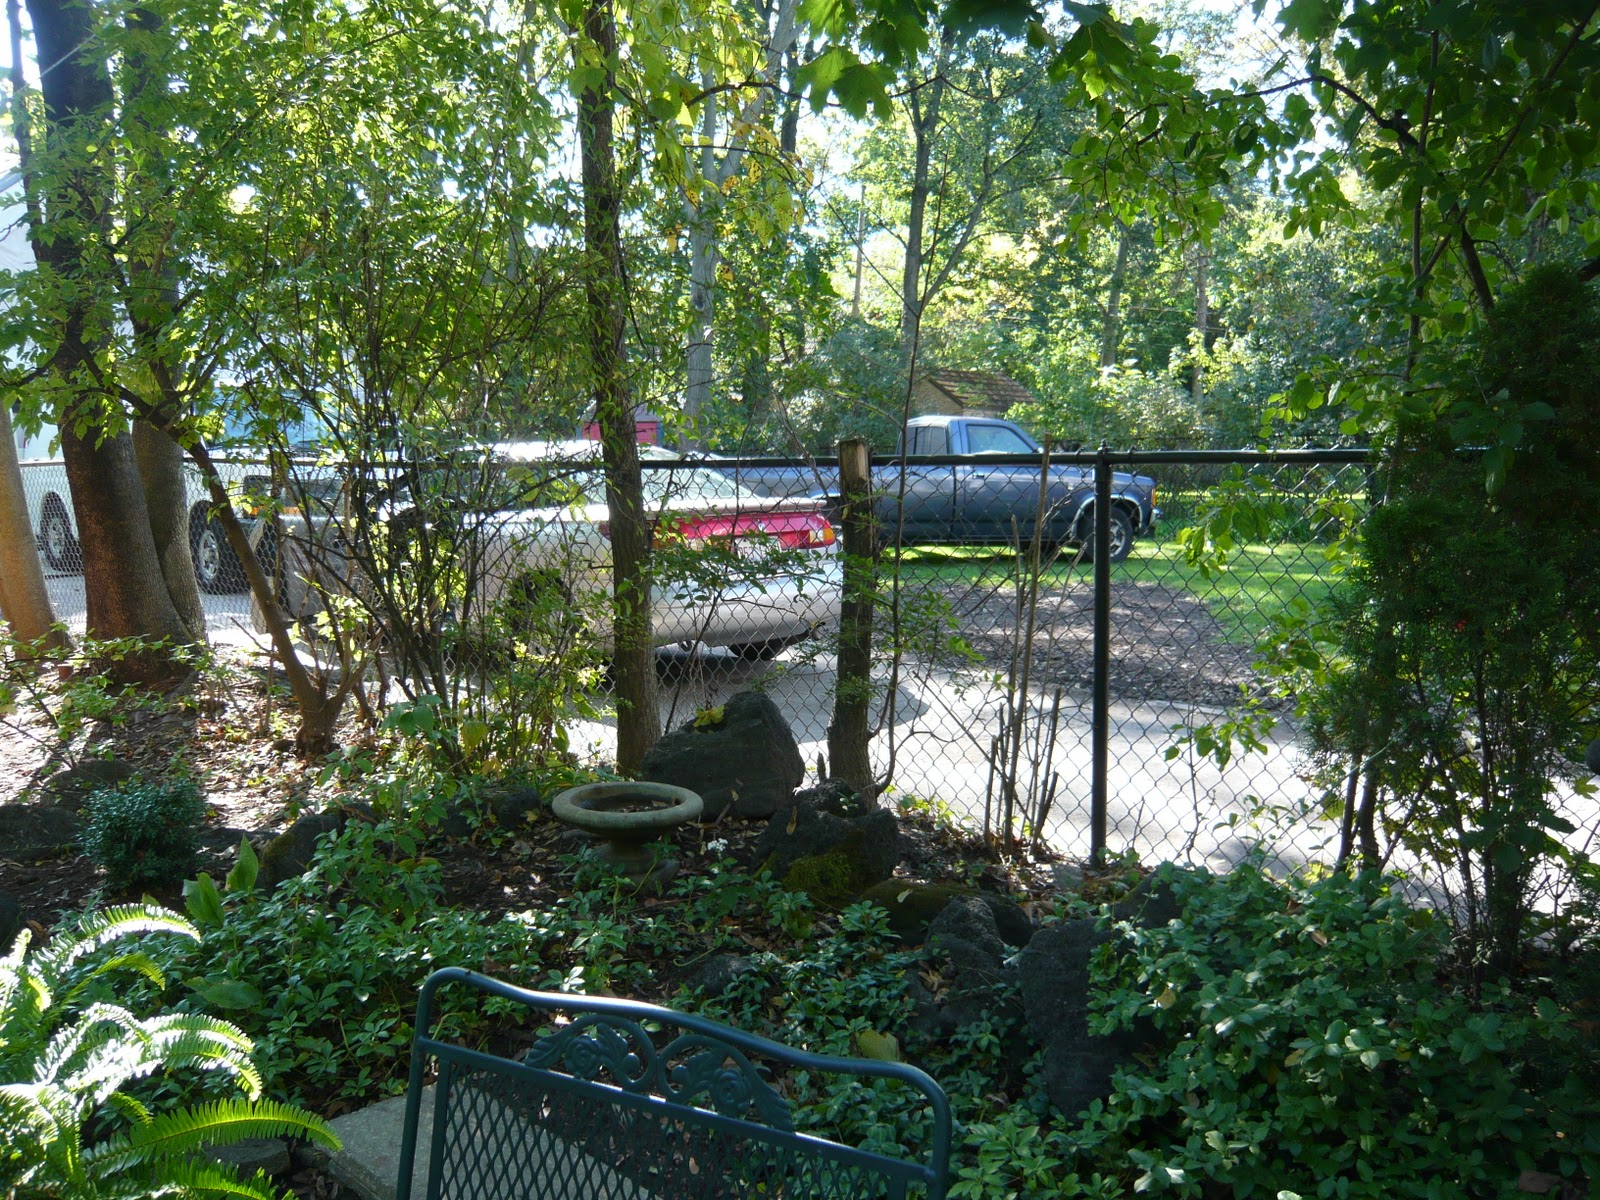
We decided to replace our broken down, missing sections, all around terrible chain link fence! A great idea, but it has taken a lot of work. Check out some of the steps below:


Removal of one big tree that hung over the driveway, brought down part of the fence and practically hung on the roof of our home. Check out how much more light we get now!

Lots of overgrowth had to be cut back and removed to go from this....


to this...


to this...


and finally, to this...


And most importantly this...

The future home of my raised bed garden!

Obviously, still work to be done, but I am thrilled with the progress thus far. Next step, staking out the raised beds to be built before full flung Winter hits.  My compost is composting and it needs a new home!

Anyone have any advice? I'm all ears.
Read more ...

Sub-Standard Floral Arrangement?

Have you ever received flowers, and while you know it was a lovely gesture, just felt like they really weren't you?

I have and I almost feel a twinge of guilt for the post that I am about to write...but you know I'll do it anyway.

Last week, I received a beautiful floral arrangement from my husband for our anniversary. It looked a lot like this.


After enjoying it for the majority of the weekend, I decided it (or maybe just me) was ready for a change.

Remember this guy from my Fall display?


Well, his time had come and gone, but I still liked the overall look, so I decided to switch out some of the flowers. I came away with two separate arrangements that are more fitting to my style!

Here's how I did it.

Step 1: remove all flowers/foliage/filler to start from scratch. Separate feature flowers into two piles (or however many arrangements you want to make).

Step 2: add back some of the filler flowers to form a base for the arrangement and any salvageable flowers from the original arrangement.

base and salvageable original flowers

Step 3: Add in remaining large feature flowers as determined in Step 1.

base with original flowers and new feature flowers

Step 4: fill out arrangement with remaining filler/foliage as needed.

complete new floral arrangement

Step 5: repeat for any additional arrangements, as needed.

bonus second arrangement

Voila, two arrangements for the price of one. What could be better, right?

Read more ...

Mom Cave Organized

I swear, this will be the last post (for now) pertaining to my Mom Cave. I don't want to beat a dead horse after all, but I do want to share a couple last tips regarding the decor and organization!


On the counter top:
1. cork tiles - extremely versatile (I've also used them in the kitchen)! I use these to organize ongoing projects, either for clients or ideas for around my own home. One per project.

2. cork board - my biggest inspiration board, currently holding plans for our upcoming kitchen remodel.

3. dry erase calendar - great for organizing posts and ideas for upcoming posts.

4. magazine sleeve and filofax - great for organizing the endless references I keep on hand.

On the floor: I found this all cotton, 5'x 8' rag rug at TJ Maxx for $29.99. Such a bargain and goes along way to warming up the space!


Seeing inside these cabinets is nothing special, but in the interest of full disclosure, I'll give you a little peak.


Left hand cabinet - containers, mostly for plants, some just decorative. I keep vases for fresh cut flowers upstairs near the kitchen.

Middle Cabinet - decorative seasonal items: candles, shells, gourds, Easter eggs, greenery, pine cones, etc.


Right Cabinet - overflow kitchen items, anything relating to eating and drinking.

Craft Drawer - ribbon, scissors, glue, etc. Anything that I may need or have used on a project.


The open shelving holds most of my projects and helps me to remember what I have to get done!

If you look closely you'll see the clues to many an upcoming post...spray paint, caning jars, bins of fabric - it's all there just waiting for me to create.

I also have a wrapping paper organizer which I find extremely helpful for containing all the many bits and bobs that are associated with gift giving.


OK, I am fully aware that this isn't the most exciting post!  But organization is so key in keeping a home running smoothly and of course welcoming any last minute or unannounced guests, that I think it's an important topic to cover regardless of the excitement level.

Nothing in this space looks perfect, but everything is easily accessible and has it's own home, which makes tidying up and most importantly, finding it again, so much easier. Perhaps one of the reason that this space makes me so happy and has slowly grown to become my Mom Cave.


Read more ...

Mom Cave Basics

Phew, yesterday's Mom Cave (aka the laundry room) reveal was a tough post to write - initially the requirement was 100 words or less! That's not easy to do and because of it, I now feel the need to elaborate. Besides, I am sure you are curious, right?

I wish I had a photo of the TRUE before, but this will just have to suffice.

Prior to this there was: no drop-ceiling (just exposed pipes and holes leading to nowhere), one bare light bulb, no drywall, no cabinets, a non-painted floor, and windows that were old and leaking - needless to say, not a place anyone would want to spend any real time.

When we first moved in, I would literally put my wellies on at the top of the stairs and make a run for the laundry room. I should mention that this was proceeded by a pep talk about how I shouldn't be afraid of my own basement! I know, kind of pathetic.


A vast improvement over what we had started with - the laundry room stayed in this condition for almost a year.
 
But I filled the storage pretty quickly, mostly because it was never properly organized and then I started this blog...and I needed A LOT more storage and work space ASAP!
 
Some of the basics:
1. New knobs on the cabinets and drawers - your basic .99 Home Depot variety, but what a difference in terms of ease of access! Round Cabinet Knob - Polished Chrome

2. Baseboard - vinyl, self adhesive baseboard for a more finished look. (notice them in the below images) m d building products 2-1/2'x20'BGE Cove Base cove base self-stick

3. Storage - since additional storage was the name of the game, I splurged a bit to get what I wanted and really needed.

In this space, I used to have a rolling wardrobe rack, ironing board and drying rack. It monopolized the whole wall and was very rarely all being used at the same time. So, I consolidated with a shelf wardrobe.


Now I have room to meet all my laundry needs, but it's much more organized and streamlined. And the biggest advantage of all is how much space it freed up for additional storage!


Open shelving holds all my wrapping paraphernalia, gifts, ongoing or upcoming projects, as well as seasonal storage. Plus, there is room to expand, which is essential; I'm sure I'll manage to fill it with something!

And now I have a open counter space - room to create, organize and enjoy!

Ah, space for my Mom Cave!


Tomorrow I'll share how I organized this space.

See, I told you there was still so much to say - 100 words or less, please!
Read more ...

Mom Cave: a place to get away, rejuvinate, be inspired!

Do I have a Mom Cave, not really, but I do have a space that I enjoy; where I get organized, create and focus on my blog...

aka the laundry room!


         A semi-quiet sanctuary...        

where I can focus on just me.

Or do a bit of multi-tasking.

Or complete a project.


Whatever the purpose, it makes me happy.
          
If I won, I wouldn't change much - it's a laundry room in the end!


Instead, I'd focus on my guestroom by incorporating an office, storage, and lounge area. It's a great space that's only used a handful of times a year - and it definitely needs an update! What a great idea, right?

Linky Parties
Read more ...

Saturday's Kitchen: Chinese Style One Pot

As the weather turns in, I do a lot of one pot cooking. It's easy, homey and tasty - at least in my opinion!

You'll probably be seeing a lot of this type of recipe creeping up on my Saturday's Kitchen posts, hope you like them as much as I do.

* please note this recipe is from BBC Good Food, I have converted some measurements where needed.


Ingredients
3-4 tbsp olive oil
6 garlic cloves , thinly sliced
good thumb-size piece fresh root ginger , peeled and shredded
1 bunch spring (green) onions , sliced
1 red chilli , deseeded and thinly sliced
1½ kg (3+ lbs) braising beef , cut into large pieces (we used ox cheek)
2 tbsp plain flour , well seasoned
1 tsp Chinese five-spice powder
2 star anise (optional)
2 tsp light muscovado (brown) sugar (or use whatever you've got)
3 tbsp Chinese cooking wine or dry sherry
3 tbsp dark soy sauce , plus more to serve
500ml (2+ cups) beef stock (we used Knorr Touch of Taste)
Steamed Bok Choi and Basmati Rice for serving

1.Heat 2 tbsp of the oil in a large, shallow casserole. Fry the garlic, ginger, onions and chilli for 3 mins until soft and fragrant. Tip onto a plate. Toss the beef in the flour, add 1 tbsp more oil to the pan, then brown the meat in batches, adding the final tbsp oil if you need to. It should take about 5 mins to brown each batch properly.

2.Add the five-spice and star anise (if using) to the pan, tip in the gingery mix, then fry for 1 min until the spices are fragrant. Add the sugar, then the beef and stir until combined. Keep the heat high, then splash in the wine or sherry, scraping up any meaty bits. Heat oven to 150C/fan 130C/gas 2 (300F).


3.Pour in the soy and stock (it won't cover the meat completely), bring to a simmer, then tightly cover, transfer to the oven and cook for 1½-2 hrs, stirring the meat halfway through. The meat should be very soft, and any sinewy bits should have melted away. Season with more soy. This can now be chilled and frozen for up to 1 month.


4.Nestle the cooked bok choi into the pan, then bring to the table with the basmati rice straight away and tuck in.

My version - food pictures are improving, no?

Cooks note: I used beef short ribs and they worked wonderfully. I did not add the star anise.

I've made this recipe a hand full of times and like the fact that it's a slightly different take on your standard beef stew. It's just different enough to make it perfect for casual entertaining or just a family dinner.

PS. don't you just love the verbage and how casually the recipe is written? I do.

As always, if you try it and like it, do let me know. Happy eats!

Saturday Kitchen


Read more ...

Hidden Organization

All week I've been working diligently behind the scenes on my upcoming post for Monday, which will feature my 'Mom Cave' with the hopes of winning a gift certificate to HomeGoods.

I've been decluttering, organizing and arranging my little heart out - somethings are turning out well and others not so much.

Like these cork tiles, while I like them in theory, they weren't working for the space I had in mind. Time for plan B.


Actually, I didn't have a plan B.

But when I put them by our backdoor in the kitchen, with the intention of returning them - it came to me. I could use them to help tidy up this catchall.


I think every home most have a spot like this - A place where you put your take out menus, car keys, pens and paper, important stuff on the way to be filed, etc. Do you?

Some people are lucky to have a dedicated drawer or even cabinet - or a kitchen with enough counter space to accommodate a stash spot; unfortunately, I am not.


Fortunately, these light weight tiles came with double sided tape so up they went - on the inside of the cabinet door!


The perfect spot for take out menus, party invites, reminders, emergency numbers and some of my daughter's latest artwork!


And my counters are so much cleaner and organized. I can actually find what I am looking for!


All in all a success. And I am that much closer to a well organized home! Bonus.

Don't forget to leave a comment on my searching for sconces post to let me know which ones you think I should go for.

And of course, check back Monday for my Mom Cave debut!


Read more ...

Searching for Sconces: Part Deux

As you may remember I posted some time ago about my search for sconces for the den turn breakfast room. Remember this photo? Brass swing arm sconces in a breakfast room, not so much!


Well, the search was going no where fast until the lovely people at CSN stores offered me the opportunity to review one of their products. In case you didn't know, they have over 200 stores and sell everything from nightstands to lighting to kitchen sinks, literally!

Obviously, I'm back on the path.

After a lot of searching (seriously, they have so many options!), I have narrowed it down to these.

TransGlobe Lighting Modern Meets Traditional Wall Sconce


Savoy House Venetian Guild  Wall Sconce in Slate - 9-9412-1-25
Savoy House Venetian Guild Wall Sconce

Artcraft Pot Racks One Light Wall Sconce

I'd love to know which one you like best, so leave a comment and let me know!

I'll be reviewing one soon - In the meantime, have a look around their site, the selection really is second to none. CSN stores

For a refresher on my previous search for sconces, click here.
Read more ...
Related Posts Plugin for WordPress, Blogger...

Lijit Ad Wijit