Designing Domesticity Our Home Projects Food Services Shop About

Nursery Reveal

Well, it's finally time. I have been taunting you for weeks with all the nursery projects and hoping/promising a reveal before our little one arrived...And I've done it!

Our last delivery arrived yesterday and we officially finished the nursery last night. The sun came out this morning so I was able to get some decent pictures - it's like it was meant to be! 

Nothing like taking it to the wire though, in fact, as most of you read this, I will be at the hospital - hopefully having a smooth induction. Fingers crossed!

So without further ado, I welcome you to Baby E's room...


Now, as most of you know, our first little girl was born in London and her nursery doubled as a guest room - needless to say, it wasn't terribly over the top! 

We moved into this house when she was a little over one years old - and to be honest, we had bigger fish to fry than creating a cute nursery - so we painted the walls the color of her most beloved and cherished favorite stuffy and called it a day. 

If you'd like to see where we started, click here


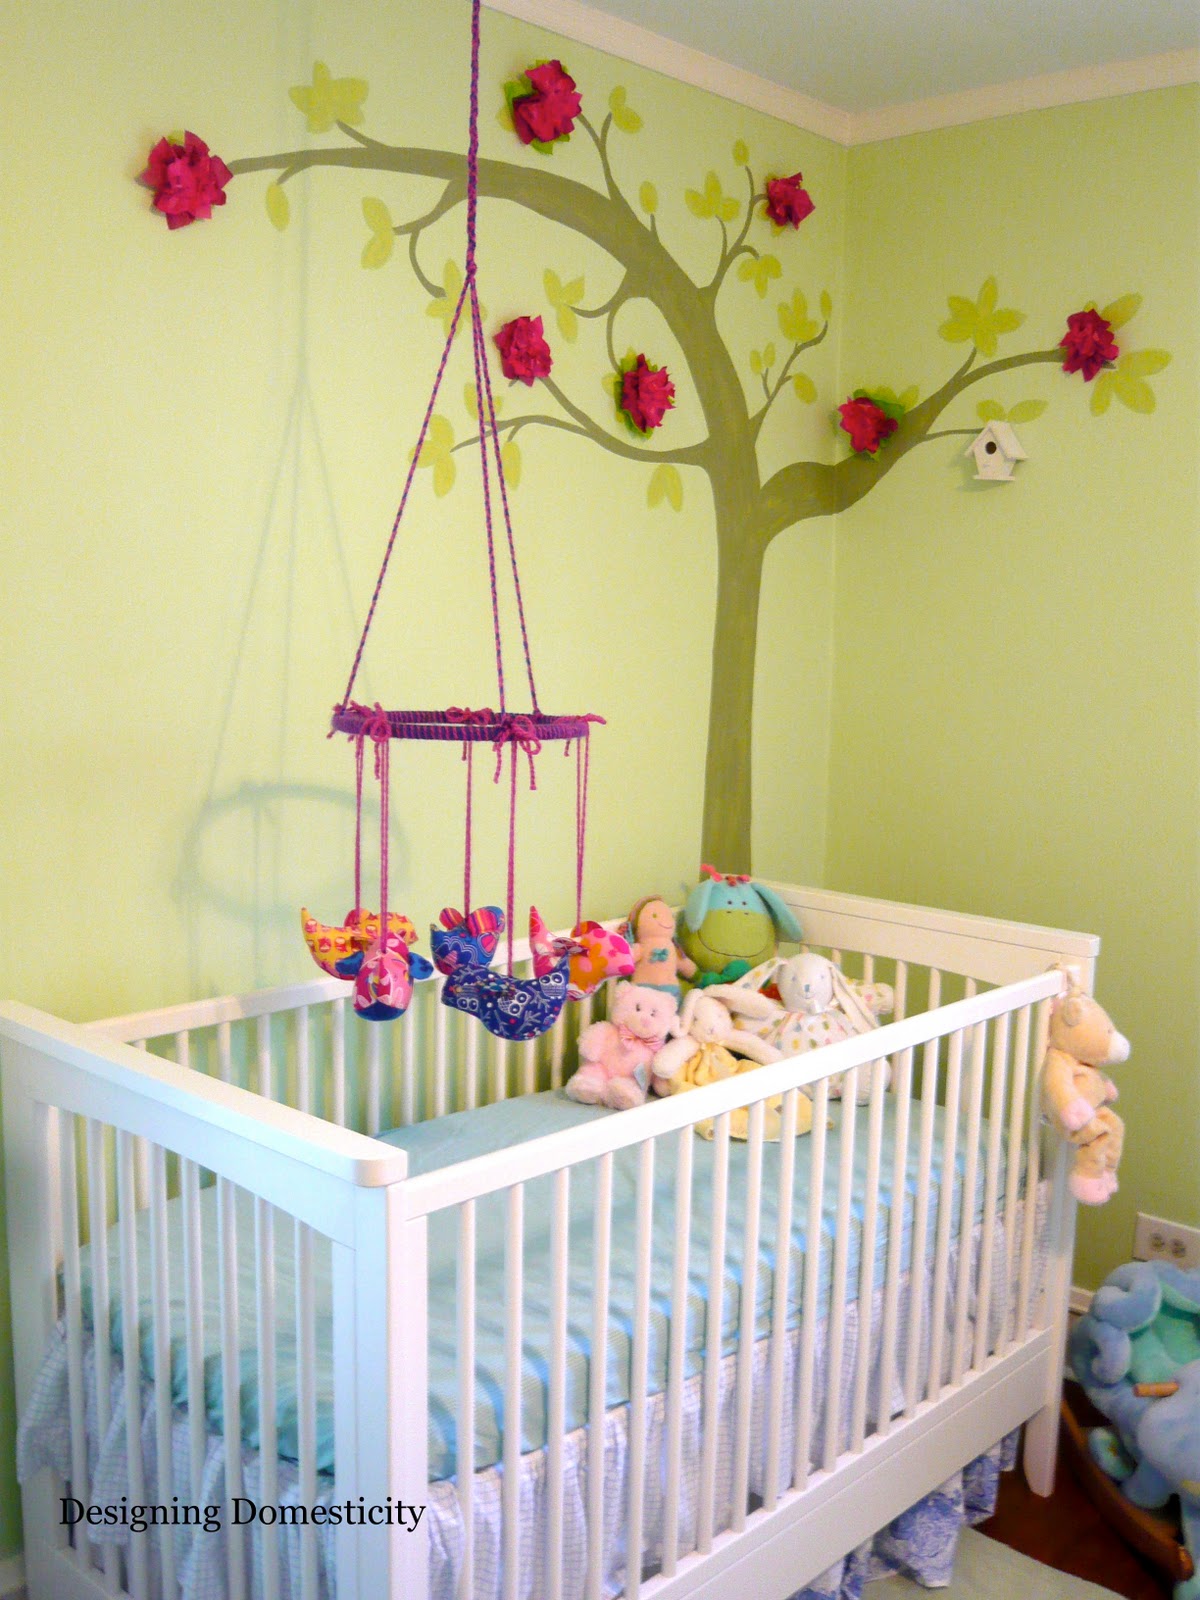
With the announcement of this little girl, I knew I wanted to update our nursery and make it special for her.

First I added the painted tree mural and then the homemade mobile. 
You can read about both projects here and here


But, of course I couldn't stop there! 
My mind was spinning with all the possibilities. 


We updated her armoire using fabric and ribbon. 
You can read all about that project here

And of course, I had to add back the glow-in-the-dark sparkly stars! 
A special gift from Daddy never gets discarded.


The space between the window and armoire was looking a bit bare, so I created this simple artwork, inspired by this Land of Nod alphabet wall art.


I've had the alphabet cards forever. They first resided in the Big Girl Room but I got tired of re-sticking them every couple of days, so they came down and awaited their next purpose. Now they are velcro-ed in place and simply hung in a poster board frame. 


Moving on over to the other side of the room, I created a simple wall gallery above her dresser, which doubles as a changing table.


A feminine mirror, another little E, a frame which awaits a new family photo (but currently holds a scrap piece of the zig zag fabric from the armoire), a chalk/pin board, and a print purchased from Etsy complete the look. 

And before you go asking - No, we won't be sharing her name until she arrives. But I figured you'd enjoy guessing in the meantime. 


I hope you've enjoyed this little peek around our new nursery. I certainly enjoyed creating it and can't wait to meet the little lady that will be calling it home. 

linking in with:

Until next time, 
Read more ...

DIY Birdie Mobile


No nursery is complete without a mobile - a little something to keep the little guys entertained during the hours they spend on their back in the crib.

We never had one with our first daughter, so I knew that I wanted to include a mobile in our updated nursery. 

I looked around online, but couldn't find exactly what I wanted, so I decided to customize one to meet our (who am I kidding, my) nursery needs.


I picked up an embroidery hoop, a couple bundles of yarn and purchased these adorable birds on Etsy.

Click here to see similar birds for sale.


I started by tying both colors of ribbon to the embroidery hoop and...


wrapping my little heart out!

I love the striped effect that two colors provide. 
Not to mention the texture!


Here's a close up of one of my birdies.
 Love the birds - didn't love the white ribbon.


But that's easy enough to fix.
So I cut off the white ribbon and replaced it with more of the pink yarn.


Then I cut long lengths of yarn and braided two pink and one blue together to make the hanging supports.
Time consuming - yes! Loving the extra little detail - YES!


I choose to use three supports, but in hindsight, four may have made it easier to hang evenly. 
Ah, well, you live and learn...


Laying the hoop on a flat service, I tied the three hanging supports together and then braided the upper portion.

Then we hung the whole thing with a little hook in the ceiling.
It weighs next to nothing, so hopefully the little hook will cut the mustard!


The birds are simply hung and tied with bows.

I like that the whole thing can be altered - the height can be adjusted as can the birds. That way if we find it's too low once the baby arrives, we can just adjust. 
Perfect!


So, what do you think? 

I think it's the perfect accompaniment to the tree.

Hopefully little No. 2 will think so too! 


A couple more projects to go, but only a week until our scheduled induction. 

Hopefully I'll have a reveal for you next Monday.
Stay tuned to find out as I race against the clock.


If you liked this post, may I suggest:

Linking in with:

Until next time, 
Read more ...

Let the Fall Cooking Begin: Roast Pork with Apples and Mustard


If you follow me on Facebook, you know that the fam and I went apple picking last weekend. 

(And if you don't, you really, really should - click here to follow along.)


Yup, that's right - I strutted my stuff around the apple orchards for all to see. Here's a lovely glamour shot for your personal enjoyment.


It was hot, we got some sun, our 3 year old enjoyed it, but wasn't very into the photos this year - and I paid the price on Sunday. But it was so worth it because now we have a HUGE bushel of all types of apples and the fall cooking can now officially commence. 

My first trial recipe was definitely a keeper: Roast Pork with Apples and Mustard from BBC Good Food, of course.


1 TBS olive oil
3 eating apples

Heat half oil in a large frying pan. Core and cut the apples in wedges, cook for about 10 minutes over medium high heat until caramelized and soft. Remove from pan and set aside.


1 lb, 2 oz pork tenderloin, sliced into medallions

Heat the remaining oil in the same pan. Fry the pork on each side for approximately 2 minutes.


7 fl oz reduced salt chicken stock
1 TBS whole grain mustard
1 TBS chopped sage leaves
2 TBS heavy cream

Add the stock and mustard to the pan, then simmer for 5 minutes or until pork is cooked through. Return the apples to the pan with the sage and cook 1 minute more.

Remove from the heat and stir in the cream and seasonings.


Serve with mashed potatoes and veggie of choice for a balanced and yummy meal! 
Enjoy!

What about you, doing any good fall cooking yet?

Linking in with:

Until next time, 


Read more ...

By Popular Demand: Tissue Paper Flower Tutorial


I have to say that I feel like I've hit a small milestone on my little blog. 

See, I always write things like - contact me with any questions, etc. Most of these requests go unanswered. 

But in the last couple of weeks, I've actually had two questions posted! 

Can you believe it - a year in the making...

Clearly I am excited.
Wouldn't you be?


So what was the question you ask?

The question was:

How did I make those cute flowers featured on my nursery tree mural?


Don't you know, I am so happy to share!

It couldn't be simpler really...

I started by folding and tearing small squares of tissue paper in a variety of colors.


I happened to find this three pack of assorted colors from Target for $1.99 - one pack was more than enough for all 7 flowers. 

Next I layered the colors - starting with green on the bottom to act as the leaves and then both tones of pink to act as the petals. I used 6 squares for the largest of the flowers and 4 for the smaller flowers.

I think the uneven torn edges add that little bit of extra texture.


Once you are happy with your colors, etc, gather in the back from the middle and start squishing the paper in to place. 

This was mostly trial and error, just working it until I found something I liked and looked remotely like a flower. Wish I could tell you there was more science to it than that, but alas, there is not.


Once you have achieved your floral look, separate the layers a bit and add a bit of hot glue to hold it all in place. 

Squish, hot glue, squish, hot glue - you get the idea.


And Voila - assorted flowers of various sizes and colors!

I applied double-sided velcro from Michael's to attach them to the wall.


Most people agree - the flowers make the tree! 

I hope you found this tutorial helpful! 
Please, please, please keep those questions coming! 

Until next time, 
Read more ...

Finishing Touches on the Shabby Chic Armoire


You probably remember this shabby chic armoire from my nursery plans post. 

No, well, I don't blame you - it's nothing spectacular to look at.


But it serves it's purpose. 

Actually, this used to hold our old box TV in the living room in our house before we moved to London. 

Needless to say, lots had changed by the time we got back!


Would you believe I actually picked this guy out of the dumpster in my first condo building in the city?

Looking at it now, I can maybe see why someone would just get rid of it.

But not me, I've got plans to dress this little guy up a bit.
Starting with the interior.


You've seen fabric lined bookcases and built-ins, well, how about a fabric lined nursery armoire? 
I think so! 

You may remember this fabric that I also used on my memory filled shadow box project.
That's the good thing about coordinating color schemes from one room to the next - dual purpose fabric. 

The steps are pretty self explanatory: measure the space needing to be covered, mark on backside of fabric and start cutting. 
Mr. DD handled the spray adhesive for me...such a nice guy!


On went the first piece and I realized I probably should of ironed the fabric first.
You live, you learn...next piece.

I won't bore you with a play by play on each piece - I am sure you get the idea.


But I will share that I found this dough scraper to be extremely helpful when it came to getting those annoying air bubbles and wrinkles out. 

This tool is so multi-functional!


Once all the fabric was in place, I used fabric glue to cover the seams with ribbon. It went a long way to cover any unsightly cutting mistakes - and, of course, gives it a nice finished look.


Time to stage; you know I love it!

On the top shelf, I've placed Mr. DD's baby blanket, mine and our oldest daughter's. As well as some more fragile items gifted to the girls. 


The bottom shelf holds an assortment of soon to be loved baby books, toys and stuffies. 

See that white polar bear hiding in the corner - yup, that was my very own lovey growing up, Snuggles. I'm not too proud to admit it.


A vast improvement over where we started! 
Wouldn't you say?

This corner is coming along nicely. I have one more project I'd like to include over here - but time is slipping away, so we'll see if it gets done. For now, I won't ruin the surprise.

Hope everyone had a nice weekend!

If you enjoyed this post, may I suggest:

Linking in with:

Until next time, 
Read more ...

Welcome Home: Fall Front Porch

It's that time of year again - time to Fall-ify the front porch! 

I've already got my theme started with my ReStyled Harvest Fall Wreath, showcasing Autumn's rich purples and plums.


I've chosen to go with a single pot on the front steps. Surrounded, of course, by our family of three (soon to be four!) classic orange pumpkins.

The pot is planted with a Whiskey Barrel Millet, two decorative Kales, a purple Mum and three Vinca vines (borrowed from my summer pots).


Here's my rule of thumb for potting planters, you want something: tall (millet), something trailing (vinca vine), something colorful and blooming (mum), and some filler (kale). 

The light green and white of the vinca vine keep the whole planter from feeling too dark and heavy. 

Now, moving on up the stairs, welcome to the front porch.


You'll notice that I've kept my Mother's Day pineapple and lantern and thrown in yet another large purple mum in an orchard basket.  

It all coordinates so nicely with my fall wreath!


But my favorite part of the whole front porch has to be the white wicker planter. I've mimicked the front step planter by using similar plants. I chose another whiskey barrel millet, flanked by purple mums, english ivy (again borrowed from my summer planters) and purple hued coral bells.


I'm always using the back door, but I love this planter so much that I've been known to stop the car while driving down the driveway just to enjoy the view!

Ah, Fall is my favorite time of year!

If you enjoyed this post, may I suggest:


Linking in with:


Until next time, 
Read more ...
Related Posts Plugin for WordPress, Blogger...

Lijit Ad Wijit