Designing Domesticity Our Home Projects Food Services Shop About

Bedding Before and After

Once I painted the dresser white and made it my new bedside table, I knew I wanted to lighten up the bedding. The search was on. But, of course, I wanted to incorporate certain elements of my existing bedding, which only makes the search that much more challenging.


The coverlet and bedskirt were both part of my original wedding registry, which makes them some 10 years old now. I still like them, they are in good shape, and work well with the wall color, draperies and carpet in the room ... in other words, they were staying. 


Basically, I was looking for a duvet and shams to coordinate with the stone/olive color scheme. To say that these colors, even though they are neutral, aren't terrible popular at the moment would be an understatement. Literally, I've been casually looking for additions to this bedding for YEARS.


Then one day, I was perusing TJ's and ran across this Tahari duvet set. Initially, I thought it was a little too grey and kind of on the expensive side, so I put it back and went on my way. Of course, once I was home and actually looking at my coverlet it seemed PERFECT. I was almost hyperventilating at the thought of someone snagging it out from under me. But it was nap time and then we had plans after that...so it had to wait. 


I finally made it back to the store a couple of days later, and low and behold, it had meandered over to the clearance isle in our time apart. I couldn't believe my luck. It came straight home with me. It was clearly meant to be. I love you TJ Maxx.

The Euro shams are from Pottery Barn, also on clearance. They pick up the yellow of the wall color and the green from the carpet, tying several of the individual elements in the room together. Success. 


I know you love your before and afters, so check out this image of our bedding from earlier this year. 


And now. 
So much lighter and brighter.
I'm really happy with the results thus far.

But, I'm thinking one more pillow is in order. I haven't had any luck finding something to coordinate so far. I've just ordered fabric samples, so hopefully something will click.

Check out my Pinterest board for a sneak peek.

Or sign up to receive my newest posts right to your inbox - then you won't miss a thing.

Enter your email address:


Delivered by FeedBurner
Linking in with:

Until next time,
Read more ...

Eye Sore No More {Phase 2}


Last I left you, we had completed the new peat gravel patio creating a nice focal point for our garage garden. Termed phase 1, we moved on to phase 2 this past weekend. 


Time to get our plant on. 
Now, it's pretty early in the season, so we're sticking with just the hardy perennial plants for the time being. When the weather stays consistently warmer we'll move on to some blooming annuals. 


It's kind of hard to see what we have going on here because a lot of the plants need to fill in.  But you can get the idea, at least, I hope. All of the hostas were pre-existing as were the blueberry bushes. The large aborvitea was transplanted from another area in the garden.


 Of course, we needed additional plants to fill in the space. Off to Home Depot we went. We're lucky to have a flagship garden center in our area - they have every thing, at excellent prices. 

I like to have one feature plant per bed, like in our lilac garden. In this garden I wanted to feature hydrangea. Last year we purchased 4 pink annabelle hydrangea, which we incorporated. This year, I picked up 3 pink endless summer hydrangea. Yeah, for features! And hydrangea, which are some of my favorites.


Incidentally, I originally wanted blue hydrangea, but the color combo with the purple sand cherry shrub just didn't work. Throw in the red blooming Japanese silver grass and our scheme was moving more toward pink and red than blue and red. 


Oh well, you win some, you loose some. I guess I could of fought harder for the white blooming dogwood over the cherry shrub, but when that pivotal moment came and our pre-schooler requested an ill-timed potty break, I called over my shoulder - " I don't care, you pick"... I'm sure you can guess what ended up in the cart.


Now, all we can do is wait for everything to take off. 
Bloom, baby, bloom. 

Phase 3 will bring with it some blooming annuals, a fully planted window box, plus mulch. 

Until next time, 
Read more ...

Mid-Week Celebration

Recently Mr. DD received some good news at work. Nothing earth shattering, just a little something he'd been working on for awhile finally coming to fruition.  Which in my book equals celebration. 


Celebration around here usually starts with good food. The challenge is finding something special and yummy, but not too time consuming, and most importantly family friendly. 


Enter this paired down salmon en croute recipe from BBC Good Food. The bulk of the recipe can be made in advance and baked at the last minute, plus my pre-schooler loves salmon. Bonus.


Of course, nothing ever goes according to plan when you have little kids. We had good naps/quiet time, everyone was ready to go for Daddy's homecoming, and then...


Meltdown. Of epic proportions. And of course, that day, we do NOT like salmon. Of course. Oh well, what can you do? Reheat last nights spaghetti, that's what.


More for Mr. DD and me! 
Served with a simple cauliflower puree and an arugala salad. 


Ingredients
3 tbs olive oil
2 shallots, chopped
1 c. crimini mushrooms, chopped
3 cloves garlic, chopped
juice of 1/2 lemon
100 g watercress, chopped
2 tbs dill, chopped
1 tbs chives, chopped
2 1/2 tbs sour cream
6 sheets filo dough, defrosted
2 12 oz skinned salmon fillets

Directions
1. Heat 2 tbs oil in a large non-stick frying pan. Add in the shallots and fry for 2-3 minutes or until soft, then add the mushrooms and garlic and cook another 3-4 minutes or until any liquids have evaporated. Add the lemon juice and cook until all the liquid is evaporated. Remove from heat, stir in the watercress. Add the dill and chives, season with salt and pepper. Leave to cool.

2. Preheat the oven to 400F. Line a baking sheet with parchment paper. Once the mushroom mixture is cool, add the sour cream. Lay out one sheet of filo dough with the short end facing you. Brush all over with some of the remaining oil. Layer on 4 more layers of filo, oiling each as you go.

3. Lay one salmon fillet, skin side down, across the width of the filo, about 1/3 of the way up. Season with pepper. Spoon the mushroom mixture over the top of the fillet. Lay the other salmon fillet on top, skin side up. Season with pepper. Fold the short end of the pastry over the salmon, then bring the other end over the enclose the salmon. Place the seam side down on the baking sheet and fold the ends under as neatly as possible.

4. Brush the outside with the remaining oil. Scrunch up the last sheet of filo, pressing it lightly on top in big folds. The brush with the last of the oil. {Can be prepared up to 3-4 hours in advance, chill until ready to cook.} Bake 25 minutes, or until the pastry is golden and crispy. Remove from the oven and let rest 2-3 minutes before slicing.

Until next time,

Read more ...

Lessons Learned, the hard way {No.4}

When learning a new skill, some lessons just have to be learned the hard way.


Like when painting outside, sometimes the sun can come out so quickly and unexpectedly that it dries your primer before you can get a smooth coat. When this happens, the only choice is to sand down and start over. Grumble, groan.


Or when you are trying to fit in just one more quick errand while toting around two fussy kids, you can make silly mistakes. Like requesting the wrong paint color and not realizing it until you have already painted the first coat. White Dove does not equal White Down. Hmmm...


All you can do is embrace these mistakes and try to learn from them. A light coat of Golden Oak stain took my bright white dresser to a more muted antique white. Lesson learned. 


Styling is also a series of trial and error around here. Third times the charm. Fortunately, I was lucky enough to score two matching dressers from eBay. Dressers as bedside tables? Yes, please. I told you I needed storage. And the white is really going along way to lighten the look in this room. So far so good. 


Until next time, 
Read more ...

It's a Little Embarrassing

When you're known amongst your friends, family and neighbors to be their token 'design' blogger, it's often assumed that your house is in pristine condition at all times. Really, this couldn't be further from the truth.


If only you could have seen my front porch just a few short days ago. It was sad, I tell you, sad. A single pot filled with brown, shriveled up evergreens. Long past their prime. 


A door mat finally dry after a long winter, now rolling up at the edges. Cobwebs, dead leaves and a smattering of fallen petals stuck to the floor.
It was all a little embarrassing, really.


A quick trip to Home Depot later, I came home with three hardy purple perennials, a 6 pack of pansies, and some English ivy. As well as handful of determination to not have the worst pots on the block. Hey, I have a reputation to uphold here.


And because it's me and I don't want to disappoint, I decided to throw in a little DIY craft of the simplest sort. Curly willow tied with jute string adds a bit of height and interest until the plants fill in. 


Phew. Not so embarrassing anymore. Now I can concentrate on other slightly more embarrassing issues like the fact my preschool insisted on wearing 2 barrettes, a bow and a headband to school today. Ah, the stubbornness of an almost 4 year old. Good times.


linking in with:
The Nester
The Polohouse

until next time, 
Read more ...

Master Bedroom

As we slowly creep to the end of our 3rd year in this house, it feels like it's finally coming together. We've touched almost every room in the house, some more extensively than others, like: the kids rooms, kitchen, powder room and living room. Others not so much, like: the master bathroom, dining room and office. 


Missing from this list is the Master Bedroom. It's funny that a room we spend most of our time in has been left undone. I guess the excuse could be that most of that time is spent with our eyes closed! 

When we moved in, we did a bit of work to make it more livable. Long term readers may remember this image.


{Master Bedroom before}

That's right. We actually bought a house (with a lot of rooms) that looked this bad. But we knew there was potential. Potential behind that wallpaper and those terrible carpets.

We came away with a nice enough room, and certainly functional. But this lady has dreams. Dreams of more for her bedroom. 

{don't forget to check out my inspiration boards on pinterest}


{My Storage}

Primarily: more storage. But also a lighter look, hopefully new bedding, and finished window treatments.
 I know, I am so demanding! 


{Mr. DD's storage and my dressing table}

Unlike a lot of the rooms I have tackled this year, this project is going to take awhile. So don't expect to come back Monday to a brand new room. I do hope you'll stick with me though.

 To make sure you don't miss a thing, enter your email address to receive posts right to your inbox.

Enter your email address:


Delivered by FeedBurner
Until next time,
Read more ...

A Kitchen Corner

We're traveling this weekend, so no big updates from a productive weekend to share. Instead, I thought I'd share a couple little changes in the kitchen. 


The weather is warming up in and it's time to get back to my composting. I had to take a little break during the kitchen renovation last year. Something about living in the basement, pregnant - the idea of composting was just too much.


This year there are no excuses. Although I did manage to lose my counter container somewhere along the line. Lucky me, it's a good excuse to invest in a new, much more fashionable one - if I do say so myself. 


Isn't it cute? Obviously, it's new, but made to look like a vintage English container. It's just the right size at about 10" tall; not too big, but not too small either. 


And the best part is the removable liner. It easily pops out for trips to the outside tumbler. And most importantly, it's plastic so it's nice and easy to rinse out as well. 

{for more information, click here}


As long as I'm going green, I thought I'd take it to the next level by adding this sweet potted fern. The pot is from the Smith & Hawken line at Target


Of course, making room for the compost pot meant rearranging some of my other must haves. I decided to corral everything on one wooden cutting board. While I was at it, I decanted my dish soap into an old glass bottle. Actually, I first started doing this years ago, but stopped for some reason. Not sure why, as this really is way more attractive. Plus, I don't have to lock and unlock the under sink cabinet anymore. Bonus.


There's one more subtle change to the kitchen. Can you see it? Like I said, it's pretty subtle so if you missed it, don't feel bad.


The high end design and beautifully subtle color combinations of this piece really elevate the look of the entire kitchen. Wouldn't you agree?

{Baby E is now 5 1/2 months old. She is growing up so fast and loves hanging in her exercauser while I get on with the cooking.}

linking in with:

Until next time, 
Read more ...

Peat Gravel Patio How To

Last I left you, we were enjoying a cold one on our new peat gravel patio. As promised, I am back with the how-to.


Before we get started, I'm just going to tell you straight out: we totally winged this. If you know what you are doing, please feel free to stop reading now. On the other hand, if you know what you are doing and could use a good laugh, please feel free to carry on reading. Either way, suit yourself. 


I think I might of mentioned that we added over 2 tons of dirt to this garden. Previously we had some drainage issues in this space. Hopefully the extra dirt and the new gutter Mr. DD added to the garage will help with that. But anyway, I digress, what I want to tell you is that we borrowed this handy-dandy level from our neighbor. It slides on two strings, which are attached to stakes; once you get it level, you can eyeball the grade that you want. We sloped the level of the dirt away from the garage and into the yard. Well, at least that's the plan.  We've yet to test it with a good rain. 


ANYWAY...

Once we had the dirt how we wanted it, we loosely mapped out the shape of the patio. Then we used the old fashioned compass method to make our circle. Pretty sure the string shifted, but it still looked fairly circular to us, so we went with it. It's about 70" across. Oh, and I should say we centered it on the window; again, just eyeballed it.


We laid our bricks to the outside of the circle and dug about a 3 inch trench to lay the plastic edger.

My apologies for the series of shots including the blue bucket and turquoise pots. I was playing around with future plant placement, which then turned into a fun game for our pre-schooler.


Here's the afore mentioned plastic edger. We used a 20' length that we cut in half {with herb scissors} for each side. 

Note the turquoise pot: placeholder for potential blueberry bush.


We dug about a 1.5" trench for the bricks, placed the bricks, then stepped on them a couple of times. This highly technically method allowed for the bricks to stand just a smidge above the plastic edger.

Note: The brick pavers are from Home Depot. Sienna tumbled, $.49 a piece. Not part of the original plan, but sure glad they were added in this weekend. Definitely gives it a 'finished' look.


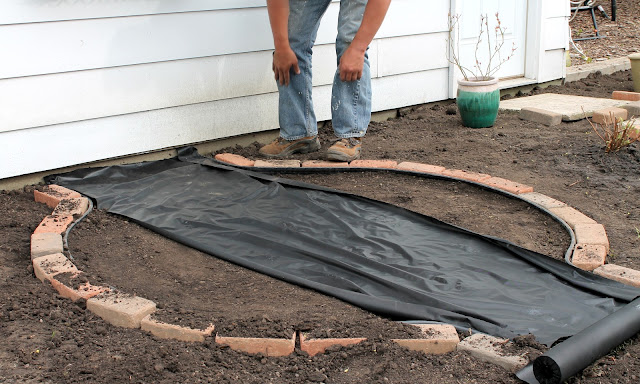
Down went the landscaper paper to try to keep the weeds at bay. Not sure how well this stuff really works as we used it in our raised bed kitchen garden and some weeds have already poked their way through. Oh well, you always have to try. Besides, I am sure it could be worse. 


Finally, the gravel was poured in and raked into place. We used 6 small bags, which is enough for about 2 inches of depth. Truth be told, we could probably add another bag or two. I'm sure they will make their way into our cart with the next Home Depot run ;)


And there you have it. A down and dirty how-to on our peat gravel patio. I hope you enjoyed and maybe even found it to be vaguely useful.

until next time, 
Read more ...
Related Posts Plugin for WordPress, Blogger...

Lijit Ad Wijit