Designing Domesticity Our Home Projects Food Services Shop About

Winter Wreath

Yesterday, I showed you our newly updated winter entry. And hinted at my coordinating wreath, which I am sure you are just dying to see; I won't keep you in suspense much longer.


Remember this guy?


I dug him out of the garage, added a bit of extra greenery to take him from Fall to Winter...


Accented with white winter berries and tied a nice, big burlap bow...


I'm quite pleased actually. At no additional cost, I was able to take this guy from Fall to Winter and coordinate him with my planters.

Who doesn't love a fully coordinated outdoor scheme, right?

Until next time,
Read more ...

De-Christmas-ing the Entryway

It's officially, almost, February - no more excuses, the last of the Christmas decor must be put away!
That's what I thought to myself while I drove the car past our front entrance last week.

Someone must of heard me because the temperatures finally rose above freezing for the first time in weeks, so I got out there to work a bit of magic.


I removed all my red berried items and replaced them with white winter berries and purple eucalyptus. The majority of the greens, dogwood twigs and pinecones stayed.
(It helped that they were mostly frozen in place!)

After: Winter Entrance

I was really fortunate to find two huge faux branches of winter berries on clearance at my local nursery. A couple of clips later, I had enough little branches to accent all three planters and the wreath.


A little brighter - and a slight nod to Spring.


The eucalyptus came from Michael's.


Wanna see my new Winter wreath? Check back tomorrow to see how it all came together.

Hope you had a nice weekend!

Until next time,
Read more ...

Saturday's Kitchen: Banoffee Pie and a Stickie!

What is it, exactly, you may ask?
Just what it sounds like - the world's best combination of banana and toffee ever!

We first ran across this dessert while living in London, but it wasn't until we returned to the US that I actually made one, or two.


Ingredients:
Graham Cracker Crust ( I bought mine as I was short on time, but there are a million and one recipes to make your own)
2 cans sweetened condensed milk
2 bananas
Heavy Whipping Cream or store bought whipped cream
Vanilla extract
powdered sugar
Small chocolate bar (optional)

Directions:
To make toffee: remove labels from unopened sweetened condensed milk cans. Submerge in pot of water, bring to boil, boil covered for 2.5 hours. Make sure to keep the cans of milk covered with water, meaning you'll have to top up from time to time.

To assemble: slice bananas into bottom of graham cracker crust. Open sweetened condensed milk cans and stir until toffee reaches a pourable consistency. Pour over bananas. Refrigerate to set.

Before serving: Whip cream, adding sugar to desired sweetness (1 tbs.) and a 1 tsp of vanilla, or crack open store bought whipped cream. Mound on top. grate small amount of chocolate bar over top for a decorative finish, if so desired.

I've had fairly good results with this recipe, although the last time I made it, it didn't set very well - hence the less than stellar picture. Fortunately, it tastes great regardless of how well it sets!

Wine Pairing:
This is an extremely rich and decidant dessert on it's own, but if you really want to go all out, try it with a dessert wine.

Dessert wines are generally fortified wines that are sweet in nature and pair well with all sorts of desserts - from sweet to savory. There are a couple of trains of thought on pairing dessert wines, but I tend to go with the classic, sweet - sweet combination! What can I say, I have a massive sweet tooth!

I recently discovered the Canadian Ice Wine, Jackson - Triggs Proprietors' Reserve 2007 Riesling Icewine. It's honey colored and intensly sweet.

A great introduction to the wonderful world of Stickies!

As always if you try it and like it, please do let me know.


Until next time,

Read more ...

Personalizing a Foot Stool

If you follow me on Facebook, you'll know that my planned craft for today was foiled. I had intended on making my own moss balls, but found them for sale at Michael's for a ridiculous $4.99 - no way to beat that, so it was time to fall back on Plan B for this week's craft.

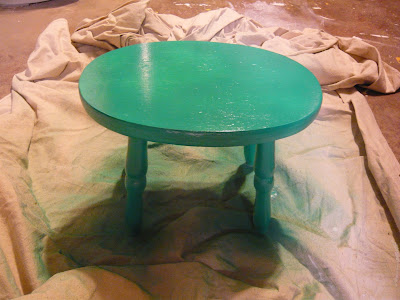
Enter the $8 foot stool

This is one of those projects that has been on the back burner for quite some time.
I picked up the stool at a local antique market for $8 this past Fall - the plan was to paint, stencil and distress it.

First a coat of Valspar Jade.


20 minutes later, a ring of Valspar Bronze (left over from the golden pinecones).


20 more minutes, an allover coat of Valspar Sky Blue.


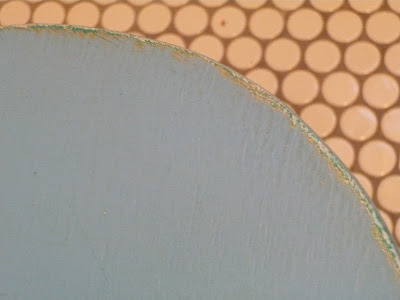
1 hour later, a light sanding around the edges to reveal some of the various colors.


Time to stencil (left over from the BGR, for a tutorial, click here).

At this point, I let it dry overnight then went back in for another light sanding.

Getting angled, zoomed in, shots of distressing is really hard! Here are a couple of attempts:


I think you get the idea!


And here she is all settled into her new home. I'm loving this pop of color in our powder room. And I have a sneaking suspicion that my daughter will help bring the distressing to a whole new level!

Not bad for a first time distresser - wouldn't you say?

Until next time,


PS. if you'd like to follow me on facebook, click here. Or just become a Google friends follower in my sidebar to the right.
Read more ...

Playing with Scale, in the Bathroom

Remember my recently styled shelves, which featured this lovely little mirror?


I stole it from here...

Powder Room (at Christmas)

Which left me with a minor spot to fill.
Truth be told, I had been wanting to switch out this mirror with our foyer mirror for quite some time,
so when opportunity called - I came a answerin!


What do you think?
Is it too big?
Mr. DD thought so.


But I love how much light it reflects around this small and somewhat dark space.

And for the record, he changed his opinion within an hour of it being hung.
Love when that happens.

This large scale piece makes a huge impact in a relatively small space - which, in my opinion, is a great thing in a powder room.

What do you think, is your powder room high on drama?

Until next time,


Linking in with Savvy Southern Style BTB party.
Read more ...

Guest Suite Hallway Nears Completion

It's been a couple of weeks now since I have mentioned our guest suite updates, but that doesn't mean that they aren't moving full speed ahead. Especially now that we have the real motivation of some very special guests coming to stay in February.

Here's where we left (click here for a refresher) you...

Not cute

And here's where we are today...


Two coats of wall paint, one coat of ceiling paint, a coat of primer and two coats on the trim! Just typing it all wears me out...it was quite the painting project. Not that I had anything to do with it, Mr. DD did the whole thing himself. What a star!


I shopped the house and had a little fun accessorizing our newly painted white shelves! Recognize that mirror? More to come on that little change.


Even the door knobs have received an update. Out with the dated brass and in with an updated oil rubbed bronze, which will coordinate well with our new fixture, whenever I get around to ordering it.


Carriage House Chandelier

I'm loving this carriage house light from Ballard Designs...decisions, decisions.

The hallway has been transformed with just a couple cans of paint. It's no longer dark and boring - now it's light, bright and an all together more welcoming space. Ah, the magic of paint!

Until next time,


Photobucket

Read more ...

So easy, no sew curtain update

Most of you won't be surprised by this project as you have seen me work with ribbon once or twice! But this was so easy and so quick that I really couldn't not post a mini tutorial.


I have 5 of these curtains dotted around our house. At about $16 a piece, these Target beauties really can't be beat. But let's face it, there's really nothing to them. They aren't exactly special as is.

Awhile back, my Mom suggested that I give them a more custom look with ribbon. So I did just that...


I started by cutting off the original attached ties.


I placed ribbon over the seam of the original tie and pressed it in place with my old friend, Stitch Witchery.


I used the same piece of ribbon looping from the front to the back - just in case the fusing tape fails, it won't all come crashing down. Make sense?


Once the curtain was back up, I just tied the ribbon ends together and tucked the tails behind the curtain. 
So easy; the whole project, start to finish, was completed in less than 10 minutes!

Here's another look...


Before


After

A slightly more custom look for very little time, effort and money - gotta love that!

What do you think, will you give it a try?


Read more ...

Online Consultation: Three Boys Dining Room

You may recall the online consultation I conducted for my fellow blogger and friend over at Three Boys not to long ago. Well, we had such fun working together that we decided to do it again, this time concentrating on her former dining room. Here it is in all it's glory...

Three Boys dining room, before

You may also recall her recent family room make-over, check it out here, which included a new dining space. The new, more family friendly dining space has left little need for her former, formal dining room.

The new challenge: what to do with this space?

My suggestion: Library

A library will provide yet another seating area, a make-shift office as well as an additional play space for her kids. A perfect solution, in my humble opinion.


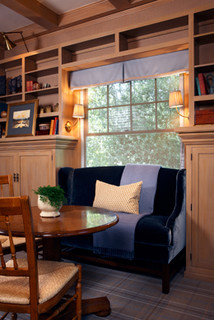
Much like this inspirational image, I suggested a feature table in the center of the room and a loveseat in front of a slim console in her bay window; book shelves lining the walls and an accent chair.

Of course, these are just suggestions - I can't wait to see what Sarah does with the space!

If you have a room that you are having trouble conceptualizing and need help determining floor plans, etc, please contact me for details. Thanks!
Read more ...

More Updates in the Living Room

I'm still working tirelessly on my guest suite hallway, so in the meantime, I thought I would share a simple update from our living room.

It seems like it's been forever and a day that I have been wanting a different table between the two armchairs in my living room.

Before

Sure, there's nothing wrong with these nesting tables, I just don't love them here.

I want a table that could hold a lamp, for one thing, and that I can accessorize. And I secretly want a table that would be big enough for fireside dining as well. Still trying to convince the husband about that one...

Over the weekend, I was sitting in the floral chair looking around the room, lamenting the fact that I have yet to change anything in this space, despite spending hours looking...and it struck me: why not just change out the table with the table flanking the sofa?

Before

It all seems so obvious now! Although it's hard to tell from this photo (sorry, old photo, was so excited about swapping out the tables that I forgot  to get an updated before!) that is a drop leaf table, which would provide the much coveted larger surface space that I was after.

Presto - Chango!

After

 
After

Loving it. And loving that it didn't cost a thing!

What's the moral of this little post? Sometimes it doesn't take a big change to make your room feel different. And always remember to shop your own home first.

Read more ...

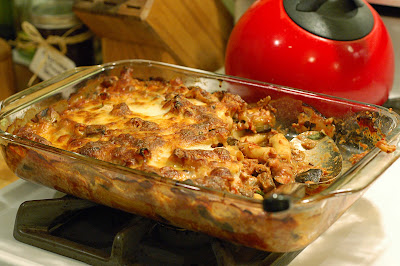
Saturday Kitchen: Baked Ziti with Sausage, Eggplant and Olives - Plus a Wine Recommendation!

A good friend just had her 3rd child and I recently brought this dish over on one of my visits.

I've actually had this recipe for about a year, but hadn't made it in awhile. Taking it to her house reminded me how much I really do like it. Plus, it freezes beautifully and makes a ton - a real plus for those quick mid week meals. And don't forget to check out the wine recommendation at the bottom of this post!


Ingredients:
4 tsp. plus 1 Tbs. olive oil
3/4 lb. sweet Italian sausage, casings removed
1 small eggplant, cut into 1/2-inch cubes
1 yellow onion, chopped
3 garlic cloves, minced
1/2 cup dry red wine
1 can (28 oz.) crushed plum tomatoes with juices
5 oz. ziti, cooked until al dente
1/4 cup chopped fresh basil
1/3 cup rinsed chopped Kalamata olives
2 1/2 cups shredded mozzarella cheese
Kosher salt and freshly ground pepper, to taste
1/2 cup grated Parmigiano-Reggiano cheese


Directions:
Position a rack in the upper third of an oven and preheat to 400°F.


In a 10-inch nonstick fry pan over medium-high heat, warm 2 tsp. of the olive oil. Add the sausage and cook, stirring and crumbling with a wooden spoon, until browned, about 5 minutes. Transfer to a paper towel-lined plate.


Discard all but 1 Tbs. of the fat in the pan. Set the pan over medium-high heat and warm 2 tsp. of the olive oil. Add the eggplant and cook, stirring occasionally, under tender and browned, about 6 minutes. Transfer to a large bowl.


Set the pan over medium heat and warm the remaining 1 Tbs. olive oil. Add the onion and cook until softened, 5 to 6 minutes. Add the garlic and cook for 1 minute. Add the wine, increase the heat to medium-high and bring to a boil, stirring to scrape up the browned bits. Cook until the liquid is almost evaporated, about 3 minutes. Add the tomatoes and their juices and simmer until thickened, about 10 minutes.


Add the sausage, pasta, basil, olives, 2 cups of the mozzarella and the tomato sauce to the bowl with the eggplant and stir to combine. Season with salt and pepper. Transfer the pasta mixture to the fry pan and sprinkle the remaining 1/2 cup mozzarella and the Parmigiano-Reggiano on top. Cover the pan, transfer to the oven and bake for 25 minutes. Uncover the pan and broil at 500°F for 5 minutes. Let stand for 10 minutes before serving. Serves 6.

Wine Pairing
New to Saturday Kitchen, will be a wine pairing tip, which based on recently received comments is something that everyone is very interested in! (See I do read all those comments! Thanks for telling me what you want!)

In terms of wine pairing, one of the easiest tips I can tell you is to stay regional.

Baked Ziti is obviously an Italian influenced recipe, so I would recommend an Italian wine.

Getting more specific, I would go for a medium bodied wine with bright red fruits; a Sangiovese or a Valpolicella would work well.

I recently discovered the 2007 Valplicella from Villa Sonia and can highly recommend it. Although it is a little on the pricey side, around $20 a bottle, it really is worth it!

As always, if you try it and like it, please do let me know!
Read more ...

BGR: Stencil

Remember this image from my resolutions post?


Don't worry, it was just a place holder to help me decide if I really wanted a big 'BGR' on my daughter's bedroom door. As it turns out, I'm sure you'll be surprised to know, I did like it! 
Here's how it came together...


Gather your supplies - fortunately, I already had everything I needed from a different stenciling project that I have been planning for months and have yet to get started on.


I started with the middle initial.

The biggest piece of advice I can give when it comes to stenciling - secure your stencil.
It's nearly impossible to get a nice line with a stencil that is slipping all over the place!


Using a thin layer of paint, start at the edge with a stabbing motion. (make sure to hold the edges of the stencil flat!) Keep going until you've reached your intended color saturation.

The paint I used took 48 hours to dry! So slow; not sure what that was all about really. Needless to say, it really put a damper on this project.


One week later and I was ready to get started again!


The moment of truth...


Not bad for a first timer!

Seriously, though, this was a bit nerve wracking because my stencils weren't sheer; I had to kind of guess on the layout...black paint on a white door, I was definitely imaging the worst!

BGR = Big Girl Room

Why?
Because a special room deserves a special sign.
And because I'm proud of myself for completing the first project I started on this blog and my daughter is proud of herself for transitioning out of the nursery!

Seems like a good enough reason to me.

Linky Parties
Read more ...
Related Posts Plugin for WordPress, Blogger...

Lijit Ad Wijit